Lucky Charms Gnome Biscoff Butter Cookie Cups

St. Patrick’s Day Gnome Cookie Cups
Lucky Charms Cookie Cups Filled with Biscoff and Buttercream Gnome Hats

If you are looking for a creative St. Patrick’s Day dessert that is fun, festive, and easy to make, these St. Patrick’s Day Gnome Cookie Cups are the perfect treat. Made with Lucky Charms Marshmallow Cookie Dough, filled with rich chunky Biscoff cookie butter, and topped with adorable buttercream gnome hats, these cookie cups are a whimsical dessert that will stand out at any holiday gathering.

These gnome cookie cups combine several favorite flavors and textures: soft cookie cups, creamy Biscoff filling, fluffy buttercream, and crunchy mini ice cream cones. The Lucky Charms marshmallows add a playful St. Patrick’s Day touch that makes them perfect for parties, bake sales, classroom treats, or festive dessert boards.

This easy St. Patrick’s Day dessert recipe uses simple ingredients and beginner-friendly decorating techniques, making it ideal for home bakers who want a show-stopping holiday treat without complicated steps.

St. Patrick’s Day Gnome Cookie Cups Recipe

Prep Time: 25 minutes
Bake Time: 12–15 minutes
Total Time: 40 minutes
Yield: 12–16 cookie cups

Ingredients

Cookie Cups
1 package Pillsbury Lucky Charms Marshmallow Cookie Dough
Nonstick spray for muffin pan

Filling
¾ cup chunky Biscoff cookie butter

Gnome Hats
12–16 mini ice cream cones
½ cup Lucky Charms marshmallows

Buttercream Decoration
1 container Betty Crocker Buttercream Frosting
Green gel food coloring
Small star piping tip
Piping bags

Decorations
Pink dragees for gnome noses
Extra Lucky Charms marshmallows for hat decorations

Tools Needed

Mini muffin pan
Cooling rack
Piping bags
Small star piping tip
Spoon or cookie scoop

How to Make St. Patrick’s Day Gnome Cookie Cups

Step 1: Bake the Cookie Cups

Preheat your oven to 350°F.

Lightly spray a mini muffin pan with nonstick spray. Place a ball of Pillsbury Lucky Charms Marshmallow Cookie Dough into each muffin cavity.

Bake the cookie dough for 12–15 minutes or until the edges are lightly golden.

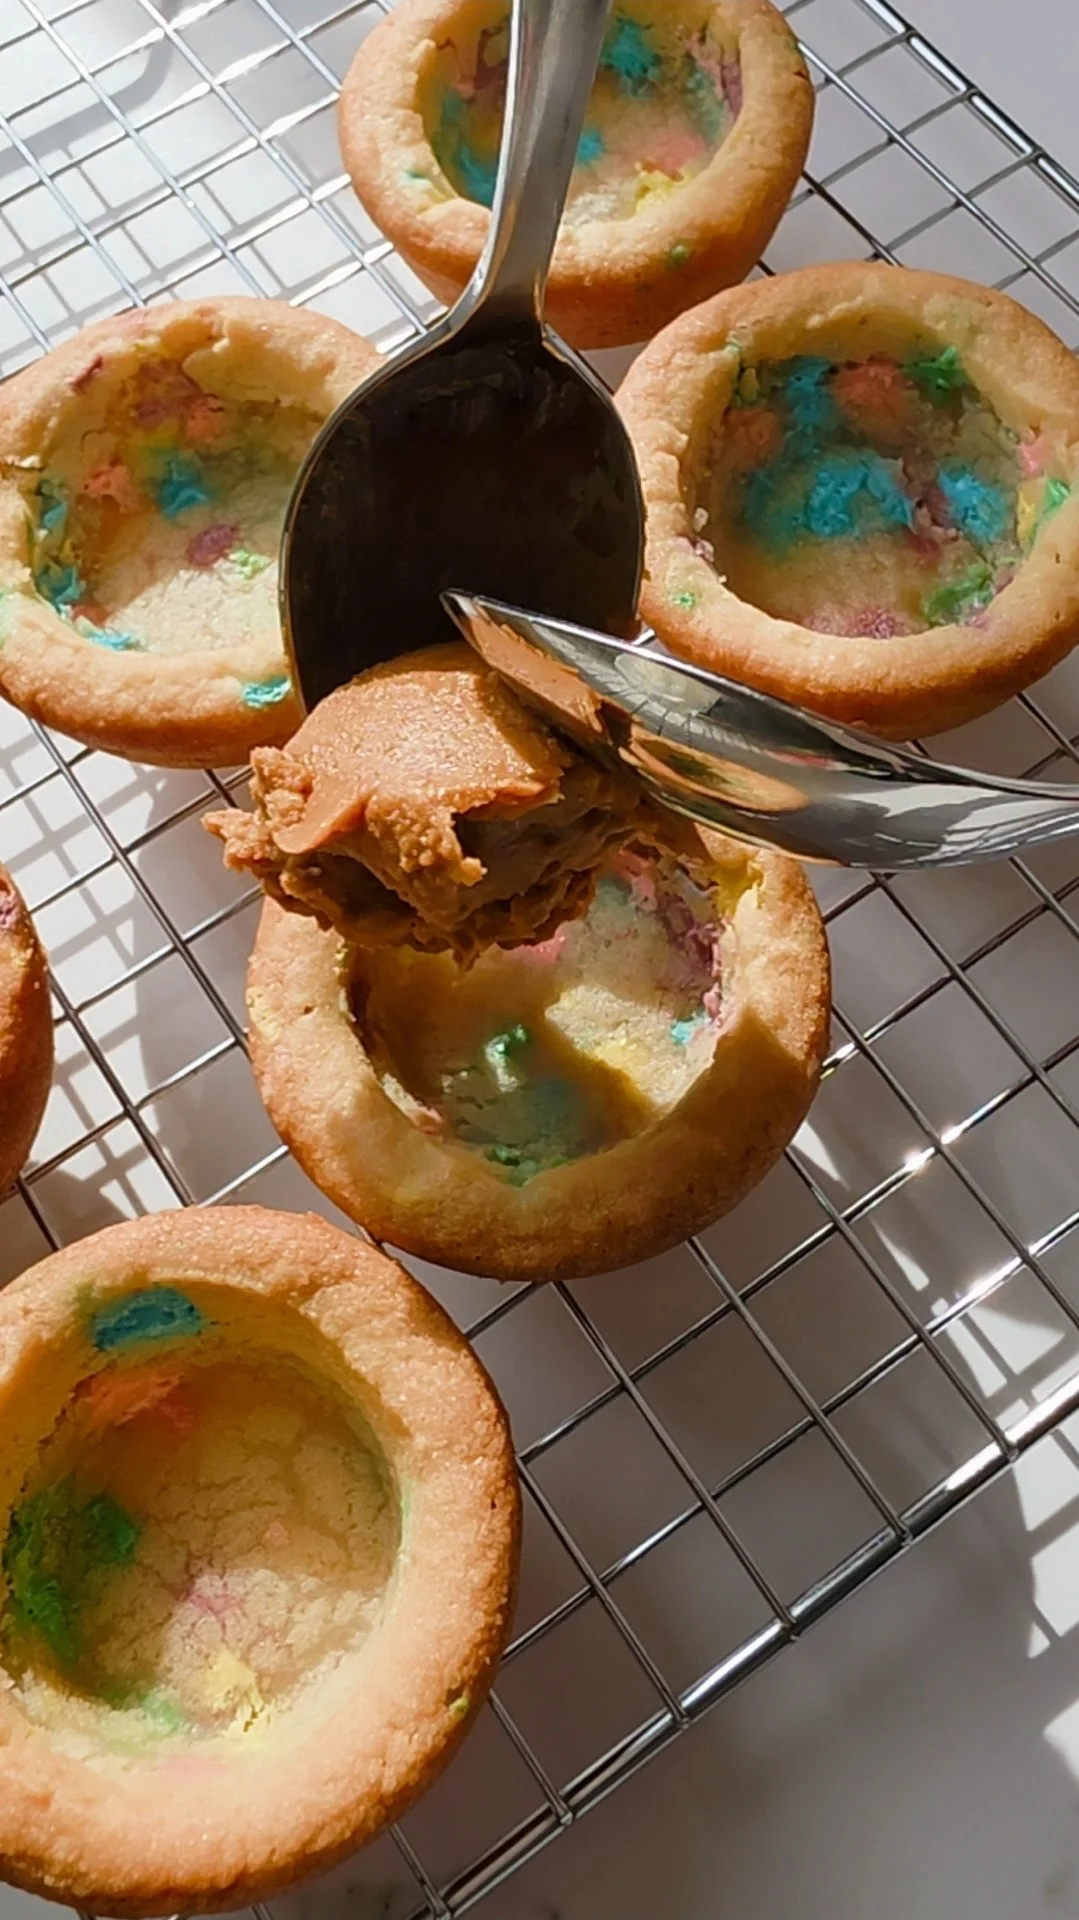
While the cookies are still warm, gently press the center of each cookie down with the back of a spoon to create a cup shape. Allow the cookie cups to cool completely before filling.

Step 2: Fill the Cookie Cups

Once the cookie cups have cooled, spoon approximately one tablespoon of chunky Biscoff cookie butter into each cookie cup.

Smooth the top slightly so the mini cone will sit securely on top.

Step 3: Prepare the Gnome Hats

Fill each mini ice cream cone with Lucky Charms marshmallows. This helps stabilize the cone when placed on the cookie cup and adds an extra sweet surprise inside the gnome hat.

Step 4: Prepare the Buttercream Frosting

Spoon the Betty Crocker buttercream frosting into a mixing bowl. Set aside a portion of the frosting to remain white for the gnome beard.

Tint the remaining frosting with green gel food coloring and mix until the color is evenly distributed.

Transfer the white frosting and green frosting into separate piping bags fitted with a small star piping tip.

Step 5: Assemble the Gnome Cookie Cups

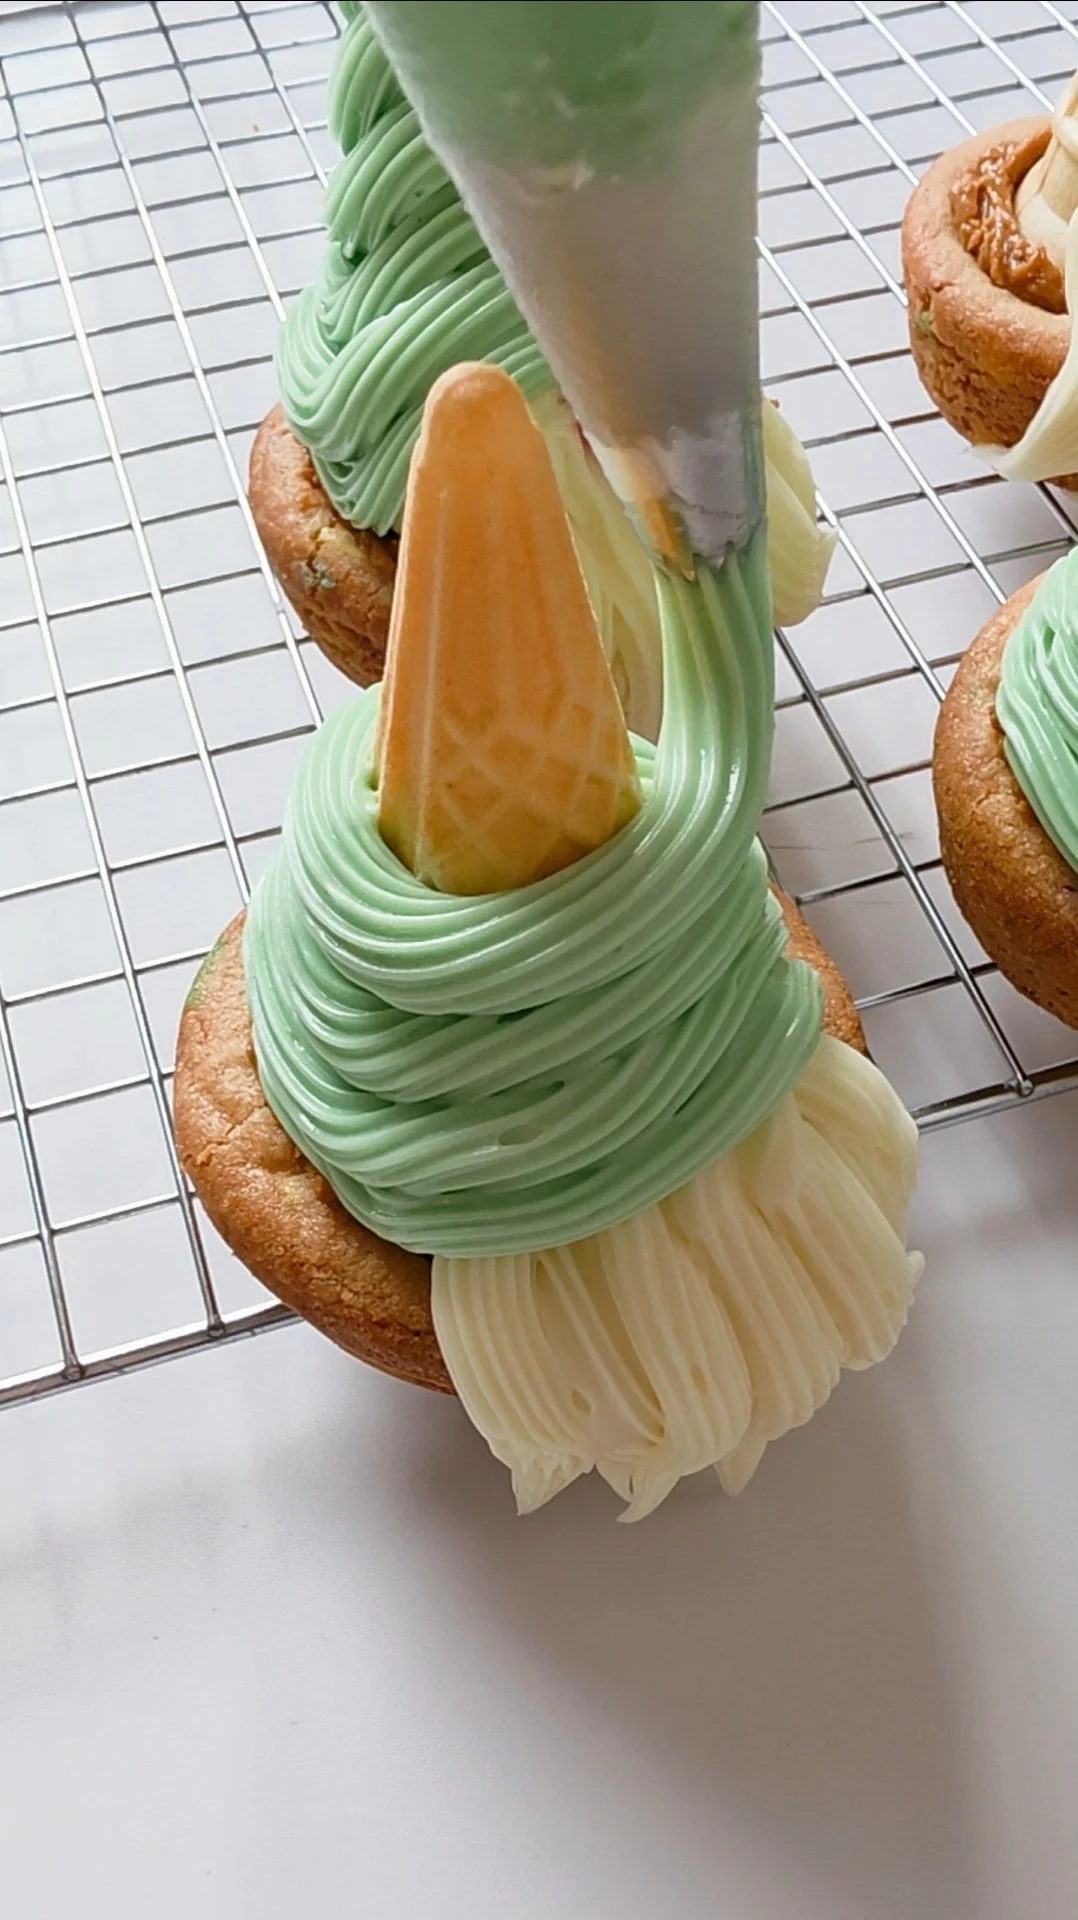
Place a filled mini cone onto the center of each cookie cup on top of the Biscoff filling.

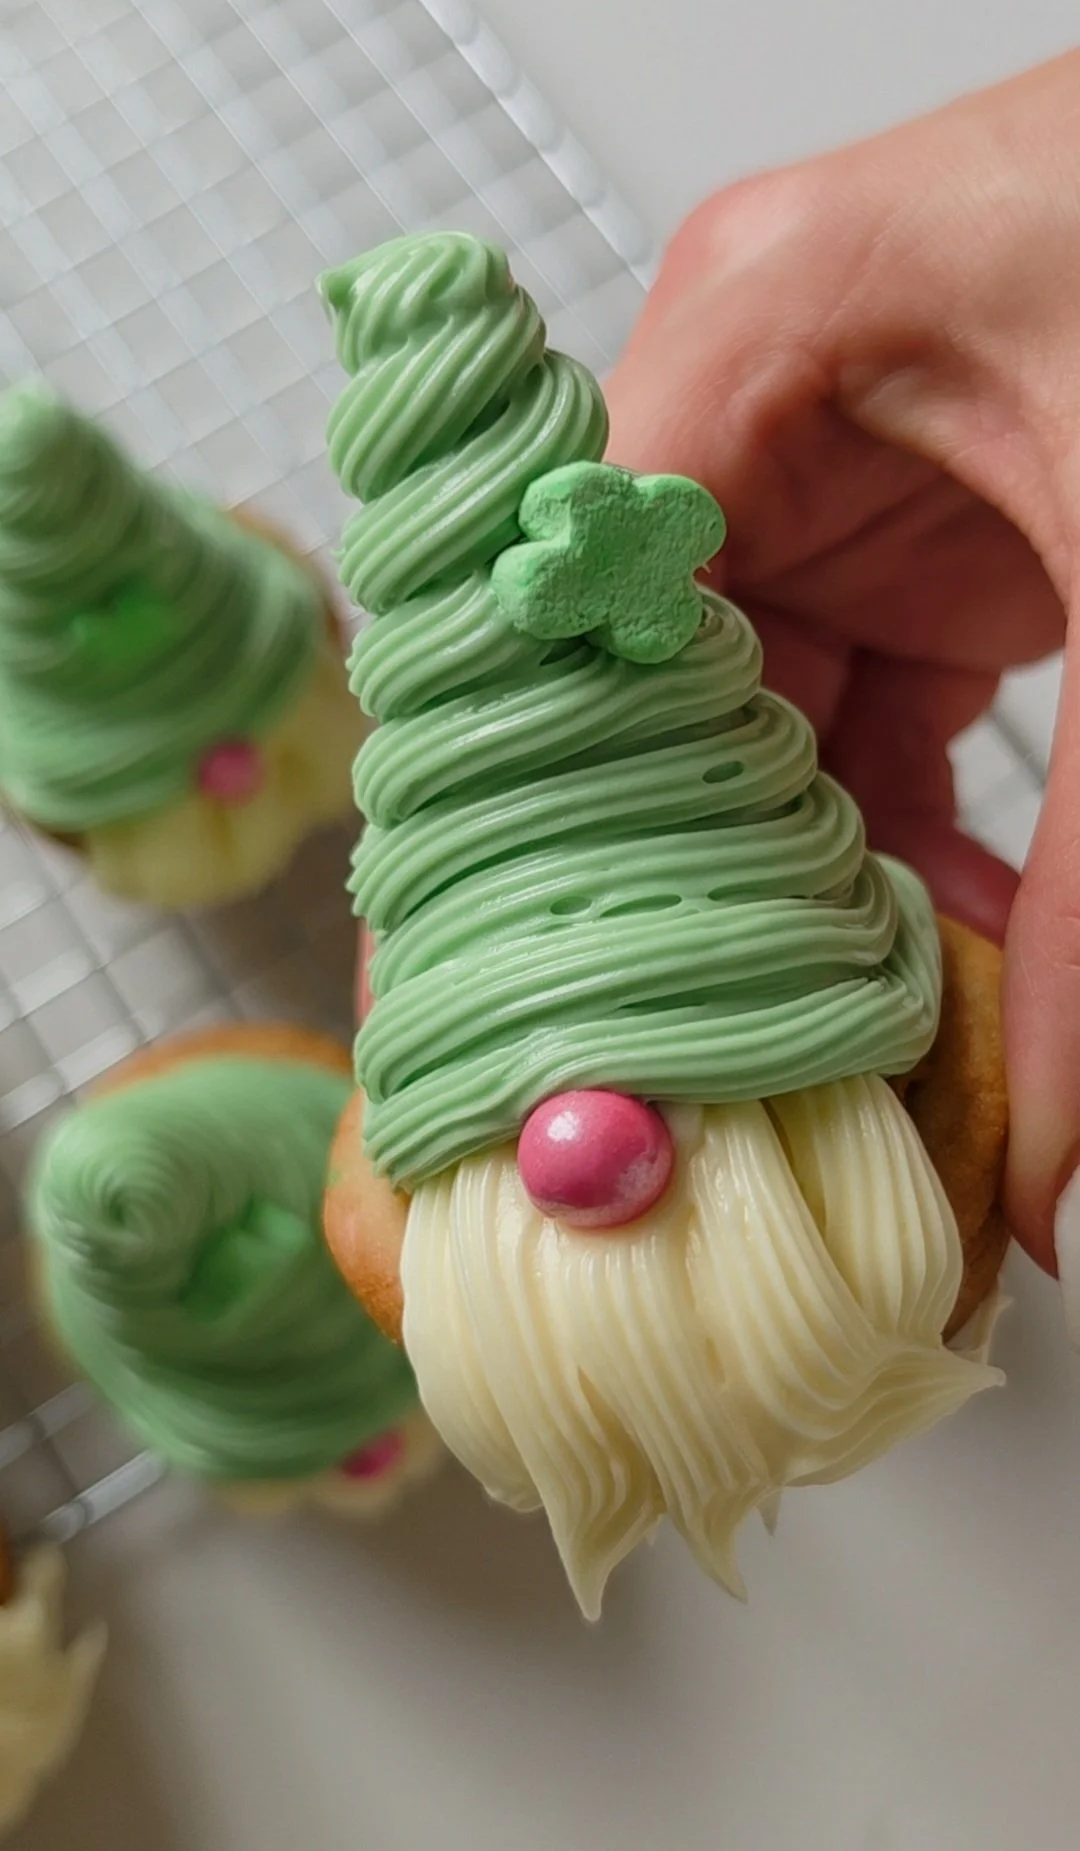
Pipe white buttercream starting at the base of the cone and pipe downward to create the gnome beard texture.

Place a pink dragee just above the beard to form the gnome nose.

Pipe green buttercream around the mini cone in spirals to create the gnome hat texture.

Decorate the hat with Lucky Charms marshmallow shapes for a fun St. Patrick’s Day accent.

Tips for Perfect Gnome Cookie Cups

Press the center of the cookies while they are still warm so they form deep cookie cups that hold the filling well.

If the frosting becomes too soft while decorating, refrigerate it for about 10 minutes before piping.

Use a small star piping tip to create the textured beard and hat design.

Add a small dab of frosting under the mini cone to help keep the hat securely attached to the cookie cup.

St. Patrick’s Day Gnome Cookie Cup Variations

Chocolate Cookie Cup Gnomes
Use chocolate chip cookie dough instead of Lucky Charms cookie dough for a chocolate version.

Salted Caramel Gnome Cookie Cups
Replace the Biscoff cookie butter filling with salted caramel sauce.

Rainbow Gnome Cookie Cups
Pipe the hat with multiple colors of frosting for a rainbow St. Patrick’s Day look.

Storage Instructions

Store the cookie cups in an airtight container.

Room temperature: up to 2 days
Refrigerator: up to 4 days

For best flavor and texture, allow refrigerated cookie cups to come to room temperature before serving.

Frequently Asked Questions

Can I make these cookie cups ahead of time?

Yes. The cookie cups can be baked a day in advance and stored in an airtight container. Assemble and decorate the gnomes the day you plan to serve them for the best presentation.

Can I use homemade cookie dough?

Yes. Any soft-baked cookie dough recipe will work for cookie cups if you prefer to make them from scratch.

What if I do not have mini ice cream cones?

If mini cones are unavailable, you can break standard sugar cones into smaller pieces and pipe frosting over them to create a similar gnome hat shape.

Why These St. Patrick’s Day Gnome Cookie Cups Are a Popular Holiday Dessert

These cookie cups combine several trending dessert ideas including holiday-themed desserts, Lucky Charms treats, gnome-themed baking, and cookie cup desserts.

The combination of buttery cookie cups, creamy Biscoff filling, fluffy buttercream, and colorful marshmallow decorations creates a dessert that is both visually impressive and delicious.

Because they are easy to make and highly decorative, they are perfect for St. Patrick’s Day parties, dessert tables, holiday baking projects, and festive social media baking content.

More St. Patrick’s Day Dessert Ideas

Lucky Charms Rice Krispie Treat Bars
Mint Chocolate Chip Brownies
Shamrock Sugar Cookies
Green Velvet Cupcakes

These festive desserts pair perfectly with St. Patrick’s Day celebrations and make great additions to holiday dessert spreads.

If you loved making this recipe, there’s so much more waiting for you in my book, Baking Magic: Awaken Your Inner Pastry Chef. It’s packed with simple tricks, pro tips, and show-stopping recipes to help you create unforgettable treats with ease.

Grab your copy on Amazon here and awaken your inner pastry chef today! 🍰✨

Disclaimer: Some links in this post are affiliate links, which means I may earn a small commission if you make a purchase—thank you for supporting my baking projects!

<!-- START The Recipe Bx --><script type='application/ld+json' class='ccm-schema'>{"image":"https://i.imgur.com/WDgMkYE.jpeg","name":"Rainbow Cheesecake","description":"Rainbow Cheesecake","recipeYield":"8","author":{"@type":"Person","name":"Sasha Nary of @SashaCakesChicago"},"recipeIngredient":["105 g (approx. 15 squares) graham crackers","55 g (1/2 stick) unsalted butter, melted and cooled","1/4 tsp ground cinnamon","454 g (16 oz) cream cheese, softened","200 g (1 cup) granulated sugar","3 large eggs, room temperature","454 g (16 oz) sour cream, room temperature","1 tsp vanilla extract","Pink, purple, blue, green, yellow food coloring gels"],"recipeInstructions":["Prepare the Crust. Preheat your oven to 350°F. In a food processor, blend the graham crackers until finely ground. Add the cooled melted butter and cinnamon, pulsing just until combined. Using a teaspoon, ice cream scooper, or shot glass, press approximately the crust into the greased 7\" baking pan. Smooth with the back of the cup, glass, or spoon. Freeze the mold while you prepare the cheesecake batter — this ensures the crust sets and won’t crumble when baked.","Make the Cheesecake Filling. In the bowl of a stand mixer fitted with a whisk attachment, whip the cream cheese for 5 minutes on medium-high speed until light, fluffy, and smooth. Add the sugar and mix on medium speed for 2–3 minutes until fully incorporated. Lower the mixer speed and add the eggs, one at a time, mixing each thoroughly before adding the next. Once all eggs are added, whip for an additional minute at medium-high speed. Stop the mixer, then add the sour cream and vanilla. Mix on low speed until smooth and lump-free (about 2–3 minutes). Avoid overmixing to prevent cracks during baking. Finally, tap the bowl on the counter to release any air bubbles. This little trick will save you from holes or bubbles in the final cheesecake.","Color the Batter. Divide the cheesecake batter into five bowls. Tint each portion with a different food coloring gel — pink, purple, blue, green, and yellow. Mix gently until evenly colored.","Assemble and Bake. Remove the crust mold from the freezer. Fill the pan with cheesecake batter , alternating the colors: drop alternating colors of cheesecake batter by tablespoon-full; once the pan is filled - lightly swirl the top of the cheesecakes batter with toothpick or chopstick. Place the filled pan into a rimmed baking pan. Add 2-3 cups of water to the pan to create a water bath. The water should reach at least halfway up the sides of the pan. This method ensures even baking and prevents cracks, giving your cheesecake that silky smooth finish. Bake on the middle rack for 50-55 minutes, or until the top is no longer glossy, edges are set, and the centers are slightly jiggly.","Cool and Freeze. After baking, leave the pan in the water bath and let the cheesecakes cool to room temperature. Once cooled, transfer the pan to refrigerator for 4–6 hours or overnight. To remove, gently release the side of the pan and push up from the bottom. Slide a large bench scraper between the cheesecake and the bottom of the pan, lift and transfer onto a cakestand, serving platter or cake board. Cut into slices with warm damp knife, cleaning it in between each cut."],"@context":"http://schema.org","@type":"Recipe"}</script><div class="ccm-card" data-ccmuid="7wnGXAGRqvVTLuTiVknq2Kp8Tez2" data-ccmcardid="4772629820610" data-ccme="c2FzaGFjYWtlc2NoaWNhZ29AZ21haWwuY29t" data-ccmcardnum="1" id="ccm-recipe-card"><div class="ccm-wrapper" id="recipe" data-ccm-sb-inited="1" data-ccm-as-inited="1" data-ccm-como-inited="1"><div class="ccm-image"><img loading="lazy" src="https://i.imgur.com/WDgMkYE.jpeg" draggable="false" alt="Rainbow Cheesecake" title="Rainbow Cheesecake"></div><div class="ccm-btns-wrapper ccm-hide-on-print"><button class="ccm-printbutton" id="ccm-printbutton" onclick="ccmpr(this);">Print</button><div class="ccm-print-options"><button id="ccm-printWithImage" onclick="ccmpr(this);">With Image</button><button id="ccm-printWithoutImage" onclick="ccmpr(this);">Without Image</button></div></div><h3 class="ccm-name">Rainbow Cheesecake</h3><div class="ccm-info"><div class="ccm-yield ccm-info-child"><strong>Yield: </strong> <span class="ccm-yield__amount" itemprop="recipeYield" contenteditable="false">8</span> </div><div class="ccm-author ccm-info-child"><strong>Author: </strong><span><span>Sasha Nary of @SashaCakesChicago</span></span></div></div><div class="ccm-summary"><p>Rainbow Cheesecake </p></div><div class="ccm-cook-mode ccm-hide-on-print"><div class="ccm-switch-toggle"></div><span style="margin:0 10px;font-size:16px;text-align:center">Cook mode</span><span class="ccm-cook-mode-description">Prevent screen from turning off</span></div><div class="ccm-section-ingredients ingredients"><h3 class="ccm-head">Ingredients</h3><div class="ccm-section"><div class="ccm-section-title">For the Crust:</div><ul class="ccm-section-items"><li><span style="background-color: transparent;">105 g (approx. 15 squares) graham crackers</span></li><li><span style="background-color: transparent;">55 g (1/2 stick) unsalted butter, melted and cooled</span></li><li><span style="background-color: transparent;">1/4 tsp ground cinnamon</span></li></ul></div><div class="ccm-section"><div class="ccm-section-title">For the Cheesecake:</div><ul class="ccm-section-items"><li><span style="background-color: transparent;">454 g (16 oz) cream cheese, softened</span></li><li><span style="background-color: transparent;">200 g (1 cup) granulated sugar</span></li><li><span style="background-color: transparent;">3 large eggs, room temperature</span></li><li><span style="background-color: transparent;">454 g (16 oz) sour cream, room temperature</span></li><li><span style="background-color: transparent;">1 tsp vanilla extract</span></li><li><span style="background-color: transparent;">Pink, purple, blue, green, yellow food coloring gels</span></li></ul></div></div><div class="ccm-section-instructions instructions"><h3 class="ccm-head">Instructions</h3><div class="ccm-section"><ol class="ccm-section-items"><li data-f-temps="350" data-c-temps="177"><span style="background-color: transparent;">Prepare the Crust. Preheat your oven to 350°F. In a food processor, blend the graham crackers until finely ground. Add the cooled melted butter and cinnamon, pulsing just until combined. Using a teaspoon, ice cream scooper, or shot glass, press approximately the crust into the greased 7" baking pan. Smooth with the back of the cup, glass, or spoon. Freeze the mold while you prepare the cheesecake batter — this ensures the crust sets and won’t crumble when baked.</span></li><li><span style="background-color: transparent;">Make the Cheesecake Filling. In the bowl of a stand mixer fitted with a whisk attachment, whip the cream cheese for 5 minutes on medium-high speed until light, fluffy, and smooth. Add the sugar and mix on medium speed for 2–3 minutes until fully incorporated. Lower the mixer speed and add the eggs, one at a time, mixing each thoroughly before adding the next. Once all eggs are added, whip for an additional minute at medium-high speed. Stop the mixer, then add the sour cream and vanilla. Mix on low speed until smooth and lump-free (about 2–3 minutes). Avoid overmixing to prevent cracks during baking. Finally, tap the bowl on the counter to release any air bubbles. This little trick will save you from holes or bubbles in the final cheesecake.</span></li><li><span style="background-color: transparent;">Color the Batter. Divide the cheesecake batter into five bowls. Tint each portion with a different food coloring gel — pink, purple, blue, green, and yellow. Mix gently until evenly colored.</span></li><li><span style="background-color: transparent;">Assemble and Bake. Remove the crust mold from the freezer. Fill the pan with cheesecake batter , alternating the colors: drop alternating colors of cheesecake batter by tablespoon-full; once the pan is filled - lightly swirl the top of the cheesecakes batter with toothpick or chopstick. Place the filled pan into a rimmed baking pan. Add 2-3 cups of water to the pan to create a water bath. The water should reach at least halfway up the sides of the pan. This method ensures even baking and prevents cracks, giving your cheesecake that silky smooth finish. Bake on the middle rack for 50-55 minutes, or until the top is no longer glossy, edges are set, and the centers are slightly jiggly.</span></li><li><span style="background-color: transparent;">Cool and Freeze. After baking, leave the pan in the water bath and let the cheesecakes cool to room temperature. Once cooled, transfer the pan to refrigerator for 4–6 hours or overnight. To remove, gently release the side of the pan and push up from the bottom. Slide a large bench scraper between the cheesecake and the bottom of the pan, lift and transfer onto a cakestand, serving platter or cake board. Cut into slices with warm damp knife, cleaning it in between each cut.</span></li></ol></div></div><div class="ccm-share-buttons ccm-hide-on-print"><a class="ccm-share-btn" target="_blank"><svg xmlns="http://www.w3.org/2000/svg" viewBox="0 0 506.86 506.86"><path d="M506.86,253.43C506.86,113.46,393.39,0,253.43,0S0,113.46,0,253.43C0,379.92,92.68,484.77,213.83,503.78V326.69H149.48V253.43h64.35V197.6c0-63.52,37.84-98.6,95.72-98.6,27.73,0,56.73,5,56.73,5v62.36H334.33c-31.49,0-41.3,19.54-41.3,39.58v47.54h70.28l-11.23,73.26H293V503.78C414.18,484.77,506.86,379.92,506.86,253.43Z" fill="#1877f2"></path><path d="M352.08,326.69l11.23-73.26H293V205.89c0-20,9.81-39.58,41.3-39.58h31.95V104s-29-5-56.73-5c-57.88,0-95.72,35.08-95.72,98.6v55.83H149.48v73.26h64.35V503.78a256.11,256.11,0,0,0,79.2,0V326.69Z" fill="#fff"></path></svg></a><a class="ccm-share-btn" target="_blank"><svg xmlns="http://www.w3.org/2000/svg" viewBox="0 0 333333 333333"><path d="M166667 0c92048 0 166667 74619 166667 166667s-74619 166667-166667 166667S0 258715 0 166667 74619 0 166667 0zm90493 110539c-6654 2976-13822 4953-21307 5835 7669-4593 13533-11870 16333-20535-7168 4239-15133 7348-23574 9011-6787-7211-16426-11694-27105-11694-20504 0-37104 16610-37104 37101 0 2893 320 5722 949 8450-30852-1564-58204-16333-76513-38806-3285 5666-5022 12109-5022 18661v4c0 12866 6532 24246 16500 30882-6083-180-11804-1876-16828-4626v464c0 17993 12789 33007 29783 36400-3113 845-6400 1313-9786 1313-2398 0-4709-247-7007-665 4746 14736 18448 25478 34673 25791-12722 9967-28700 15902-46120 15902-3006 0-5935-184-8860-534 16466 10565 35972 16684 56928 16684 68271 0 105636-56577 105636-105632 0-1630-36-3209-104-4806 7251-5187 13538-11733 18514-19185l17-17-3 2z" fill="#1da1f2"></path></svg></a><a class="ccm-share-btn ccm-share-btn--pinterest" target="_blank"><svg xmlns="http://www.w3.org/2000/svg" viewBox="0 0 333333 333333"><path d="M166667 0c92048 0 166667 74619 166667 166667s-74619 166667-166667 166667S0 258715 0 166667 74619 0 166667 0zm-40062 259007c10251-9143 17289-22164 20724-35518 1385-5264 7037-26819 7037-26819 3657 7038 14462 12967 25822 12967 34022 0 58513-31252 58513-70206 0-37291-30420-65163-69541-65163-48706 0-74527 32692-74527 68266 0 16513 8810 37126 22884 43664 2106 1052 3269 554 3768-1552 333-1607 2272-9198 3158-12800 278-1108 167-2161-776-3269-4654-5652-8422-16069-8422-25711 0-24880 18840-48983 50922-48983 27706 0 47099 18840 47099 45880 0 30531-15404 51698-35463 51698-11082 0-19393-9143-16679-20391 3214-13410 9364-27872 9364-37513 0-8644-4599-15848-14296-15848-11359 0-20391 11692-20391 27428 0 9974 3324 16734 3324 16734s-11193 47265-13243 56076c-2272 9752-1385 23439-388 32360l997 8755 111-56v-1z" fill="#bd081c"></path></svg></a><a class="ccm-share-btn" target="_blank"><svg xmlns="http://www.w3.org/2000/svg" viewBox="0 0 122.88 122.88"><path d="M61.44,0A61.44,61.44,0,1,1,0,61.44,61.44,61.44,0,0,1,61.44,0Z" fill="#25d366"></path><path d="M77,67.57c-.76-.39-4.52-2.23-5.22-2.49s-1.2-.38-1.72.39-2,2.48-2.43,3-.89.58-1.65.19a20.93,20.93,0,0,1-6.14-3.8,23.3,23.3,0,0,1-4.26-5.29A1.1,1.1,0,0,1,55.92,58c.35-.34.76-.89,1.15-1.34a5.34,5.34,0,0,0,.76-1.28,1.43,1.43,0,0,0-.06-1.34c-.2-.38-1.73-4.14-2.35-5.68s-1.26-1.28-1.73-1.31-.95,0-1.46,0a2.82,2.82,0,0,0-2,1,8.58,8.58,0,0,0-2.68,6.38c0,3.76,2.74,7.39,3.12,7.91S56,70.52,63.7,73.82a45.51,45.51,0,0,0,4.35,1.62,10.43,10.43,0,0,0,4.81.3c1.47-.21,4.52-1.84,5.16-3.63a6.37,6.37,0,0,0,.45-3.63c-.18-.34-.69-.53-1.46-.92Zm7.7-28a30.59,30.59,0,0,0-48.13,36.9L32.23,92.3l16.22-4.25a30.61,30.61,0,0,0,14.6,3.72h0A30.59,30.59,0,0,0,84.69,39.55ZM63.07,86.61a25.46,25.46,0,0,1-13-3.54l-.93-.56L39.57,85l2.57-9.38-.6-1A25.41,25.41,0,1,1,63.06,86.61Z" fill="#fff"></path></svg></a><a class="ccm-share-btn" target="_blank"><svg xmlns="http://www.w3.org/2000/svg" viewBox="0 0 122.88 122.88"><path d="M61.44,0A61.44,61.44,0,1,1,0,61.44,61.44,61.44,0,0,1,61.44,0ZM30.73,38,62,63.47,91.91,38Zm-2,42.89L51,58.55,28.71,40.39V80.87ZM53.43,60.55l-22.95,23H92.21l-21.94-23L63,66.71h0a1.57,1.57,0,0,1-2,0l-7.59-6.19Zm19.24-2,21.5,22.54V40.19L72.67,58.51Z" fill="#777"></path></svg></a></div><div class="ccm-instagram-credit ccm-hide-on-print" style="background: rgb(147, 205, 211);"><div class="ccm-instagram-icon"></div><div><h5>Did you make this recipe?</h5><div>Tag <a href="https://www.instagram.com/sashacakeschicago" target="_blank">@sashacakeschicago</a> on instagram and hashtag it #sashasrecipes</div></div></div></div></div><div data-ccmcopat="1772832369787" onanimationstart="var a = document.createElement('script');a.className='ccm-script';a.src='https://common.recipesgenerator.com/f.min.js';document.head.appendChild(a)" style="animation:a .1s!important;"></div> <style>@keyframes a{}</style>
Next
Next

Choux Pastry Swans (Cream Puffs) Recipe