
Red Velvet Strawberry Brownies
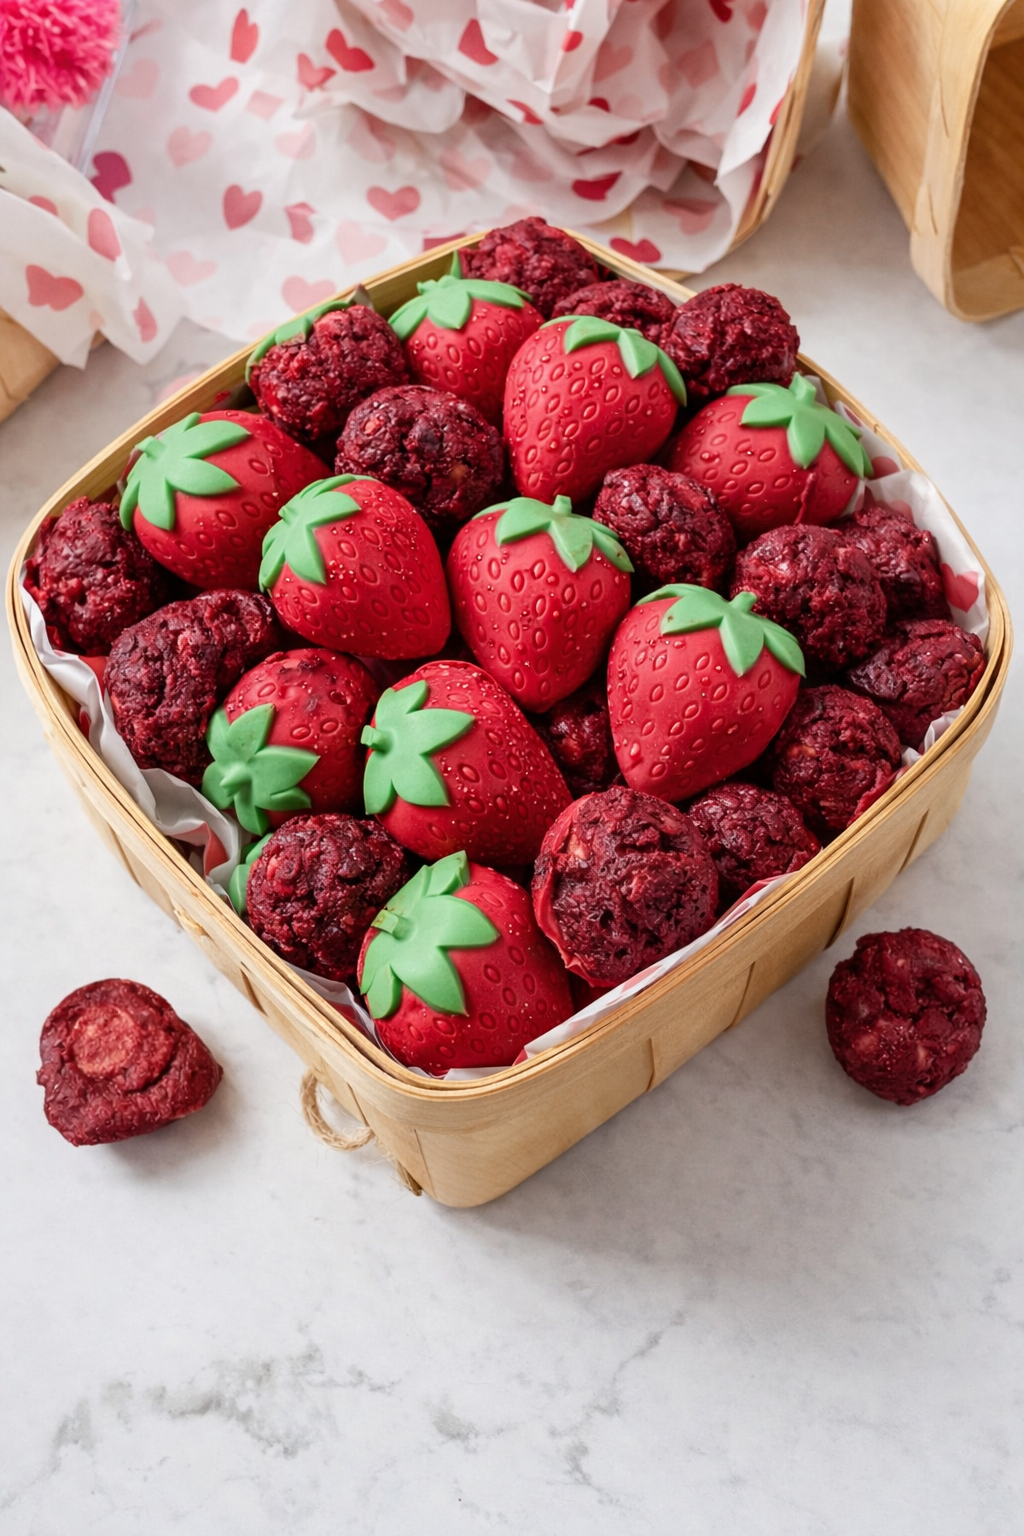
If you love desserts that wow before the first bite, these Red Velvet Strawberry Brownies are for you. Rich, fudgy red velvet brownies are molded into realistic strawberry shapes, then coated in glossy candy melts for a stunning, bakery-style finish. They’re indulgent, playful, and perfect for Valentine’s Day, spring celebrations, or anytime you want a dessert that feels extra special.
What makes this recipe truly shine is the contrast: deep cocoa flavor and soft brownie texture on the inside, paired with a crisp candy shell on the outside. The result is a dessert that looks like a chocolate-dipped strawberry but eats like a luxurious brownie.
These strawberry-shaped brownies are more than just beautiful — they’re thoughtfully designed for both flavor and presentation.
Rich Red Velvet Flavor – Cocoa-forward with subtle tang from vinegar
Fudgy Brownie Texture – Soft, dense, and satisfying
Show-Stopping Appearance – Strawberry-shaped molds and candy coating
Perfect for Gifting – Ideal for dessert boxes, parties, and holidays
Make-Ahead Friendly – Freezes and stores beautifully
They’re especially popular for Valentine’s Day, bridal showers, baby showers, and dessert tables where visual impact matters.
Ingredients for Red Velvet Strawberry Brownies
Red Velvet Brownie Batter
180 g granulated sugar
⅛ tsp salt
113 g unsalted butter, melted and cooled
1 large egg + 1 egg yolk
2 tsp vanilla extract
2 tsp white wine vinegar
30 g unsweetened cocoa powder
105 g all-purpose flour
¼–½ tsp red food coloring gel
Candy Coating
150 g red candy melts, melted
125 g green candy melts, melted
10 g white candy melts, melted
Mold
Strawberry Silicone Mold : Check out the product here
Step-by-Step Instructions
1. Prepare the Oven and Mold
Preheat the oven to 350°F (175°C). Generously grease the strawberry silicone mold with nonstick spray and set aside.
Silicone molds are ideal for this recipe because they capture the strawberry details while allowing for easy release once frozen.
2. Mix the Brownie Base
In a large bowl, combine the granulated sugar, salt, melted butter, egg, and egg yolk. Whisk until smooth and glossy.
Add the vanilla extract, white wine vinegar, cocoa powder, and flour. Mix just until combined — avoid overmixing to keep the brownies fudgy.
3. Color the Batter
Add the red food coloring gel and gently mix until the batter reaches a deep red velvet color. Adjust the amount depending on your desired intensity.
4. Fill the Mold
Fill each cavity of the strawberry mold about halfway with the brownie batter. Avoid overfilling, as the brownies will rise slightly during baking.
5. Bake
Bake on the middle rack for 20–25 minutes, or until the sides and center are fully set. A toothpick inserted should come out with a few moist crumbs, not wet batter.
6. Cool and Freeze
Remove the mold from the oven and allow the brownies to cool completely to room temperature while still in the mold. Once cooled, transfer the mold to the freezer for at least 1 hour.
Freezing is essential for clean release and easy candy coating later.
7. Prepare the Mold for Coating
Once the brownies are fully frozen, carefully remove them from the mold. Thoroughly wash and dry the mold before continuing.
8. Create the Strawberry Tops
Fill the leaf portion of each mold cavity with green candy melts. Place the mold in the freezer for 5 minutes, or let it sit at room temperature for 20–30 minutes until set.
9. Assemble the Candy-Coated Brownies
Once the green candy melts have set, fill the remaining portion of the mold cavity with red candy melts.
Immediately press a frozen brownie into each cavity, gently pushing it into the melted candy until flush with the mold.
10. Set and Decorate
Place the filled mold into the freezer for 10–15 minutes, or until the candy coating is fully hardened.
Remove the strawberry brownies from the mold. Using melted white candy melts and a toothpick, draw small dots to resemble strawberry seeds.
Serving and Storage
These Red Velvet Strawberry Brownies are best served slightly chilled or at cool room temperature.
Storage Tips:
Refrigerator: Store in an airtight container for up to 7 days
Freezer: Freeze for up to 30 days
Allow frozen brownies to thaw in the refrigerator before serving.
Frequently Asked Questions
Q: Can I make these ahead of time?
Yes. These brownies are perfect for advance prep and freeze exceptionally well.
Q: Do I need gel food coloring?
Gel food coloring is recommended to avoid thinning the batter and to achieve a vibrant red color.
Q: Can I use chocolate instead of candy melts?
Candy melts work best for coating, as they set firm without tempering. Chocolate may require tempering to achieve the same finish.
Q: What if I don’t have a strawberry mold?
This recipe is designed specifically for molded presentation. For best results, use a silicone strawberry mold.
A Dessert That’s Guaranteed to Impress
These Red Velvet Strawberry Brownies combine rich flavor, fudgy texture, and stunning presentation in one unforgettable dessert. Whether you’re baking for a holiday, special occasion, or simply want to elevate your dessert game, this recipe delivers both beauty and indulgence.
Once you serve these, don’t be surprised if everyone asks where you bought them — they truly look bakery-made.

If you loved making my Strawberry Breakfast Buns Roses, there’s so much more waiting for you in my book, Baking Magic: Awaken Your Inner Pastry Chef. It’s packed with simple tricks, pro tips, and show-stopping recipes to help you create unforgettable treats with ease.
Grab your copy on Amazon here and awaken your inner pastry chef today! 🍰✨
Disclaimer: Some links in this post are affiliate links, which means I may earn a small commission if you make a purchase—thank you for supporting my baking projects!

Red Velvet Strawberry Brownies
If you love desserts that wow before the first bite, these Red Velvet Strawberry Brownies are for you. Rich, fudgy red velvet brownies are molded into realistic strawberry shapes, then coated in glossy candy melts for a stunning, bakery-style finish. They’re indulgent, playful, and perfect for Valentine’s Day, spring celebrations, or anytime you want a dessert that feels extra special.
Ingredients
- 180 g granulated sugar
- ⅛ tsp salt
- 113 g unsalted butter, melted and cooled
- 1 large egg + 1 egg yolk
- 2 tsp vanilla extract
- 2 tsp white wine vinegar
- 30 g unsweetened cocoa powder
- 105 g all-purpose flour
- ¼–½ tsp red food coloring gel
- 150 g red candy melts, melted
- 125 g green candy melts, melted
- 10 g white candy melts, melted
Instructions
- Prepare the Oven and Mold. Preheat the oven to 350°F (175°C). Generously grease the strawberry silicone mold with nonstick spray and set aside.
- Silicone molds are ideal for this recipe because they capture the strawberry details while allowing for easy release once frozen.
- Mix the Brownie Base. In a large bowl, combine the granulated sugar, salt, melted butter, egg, and egg yolk. Whisk until smooth and glossy.
- Add the vanilla extract, white wine vinegar, cocoa powder, and flour. Mix just until combined — avoid overmixing to keep the brownies fudgy.
- Color the Batter. Add the red food coloring gel and gently mix until the batter reaches a deep red velvet color. Adjust the amount depending on your desired intensity.
- Fill the Mold. Fill each cavity of the strawberry mold about halfway with the brownie batter. Avoid overfilling, as the brownies will rise slightly during baking.
- Bake. Bake on the middle rack for 20–25 minutes, or until the sides and center are fully set. A toothpick inserted should come out with a few moist crumbs, not wet batter.
- Cool and Freeze. Remove the mold from the oven and allow the brownies to cool completely to room temperature while still in the mold. Once cooled, transfer the mold to the freezer for at least 1 hour.
- Freezing is essential for clean release and easy candy coating later.
- Prepare the Mold for Coating. Once the brownies are fully frozen, carefully remove them from the mold. Thoroughly wash and dry the mold before continuing.
- Create the Strawberry Tops. Fill the leaf portion of each mold cavity with green candy melts. Place the mold in the freezer for 5 minutes, or let it sit at room temperature for 20–30 minutes until set.
- Assemble the Candy-Coated Brownies. Once the green candy melts have set, fill the remaining portion of the mold cavity with red candy melts.
- Immediately press a frozen brownie into each cavity, gently pushing it into the melted candy until flush with the mold.
- Set and Decorate. Place the filled mold into the freezer for 10–15 minutes, or until the candy coating is fully hardened.
- Remove the strawberry brownies from the mold. Using melted white candy melts and a toothpick, draw small dots to resemble strawberry seeds.