
Conversation Hearts Cheesecake Cookies: A Colorful Twist on a Classic Treat
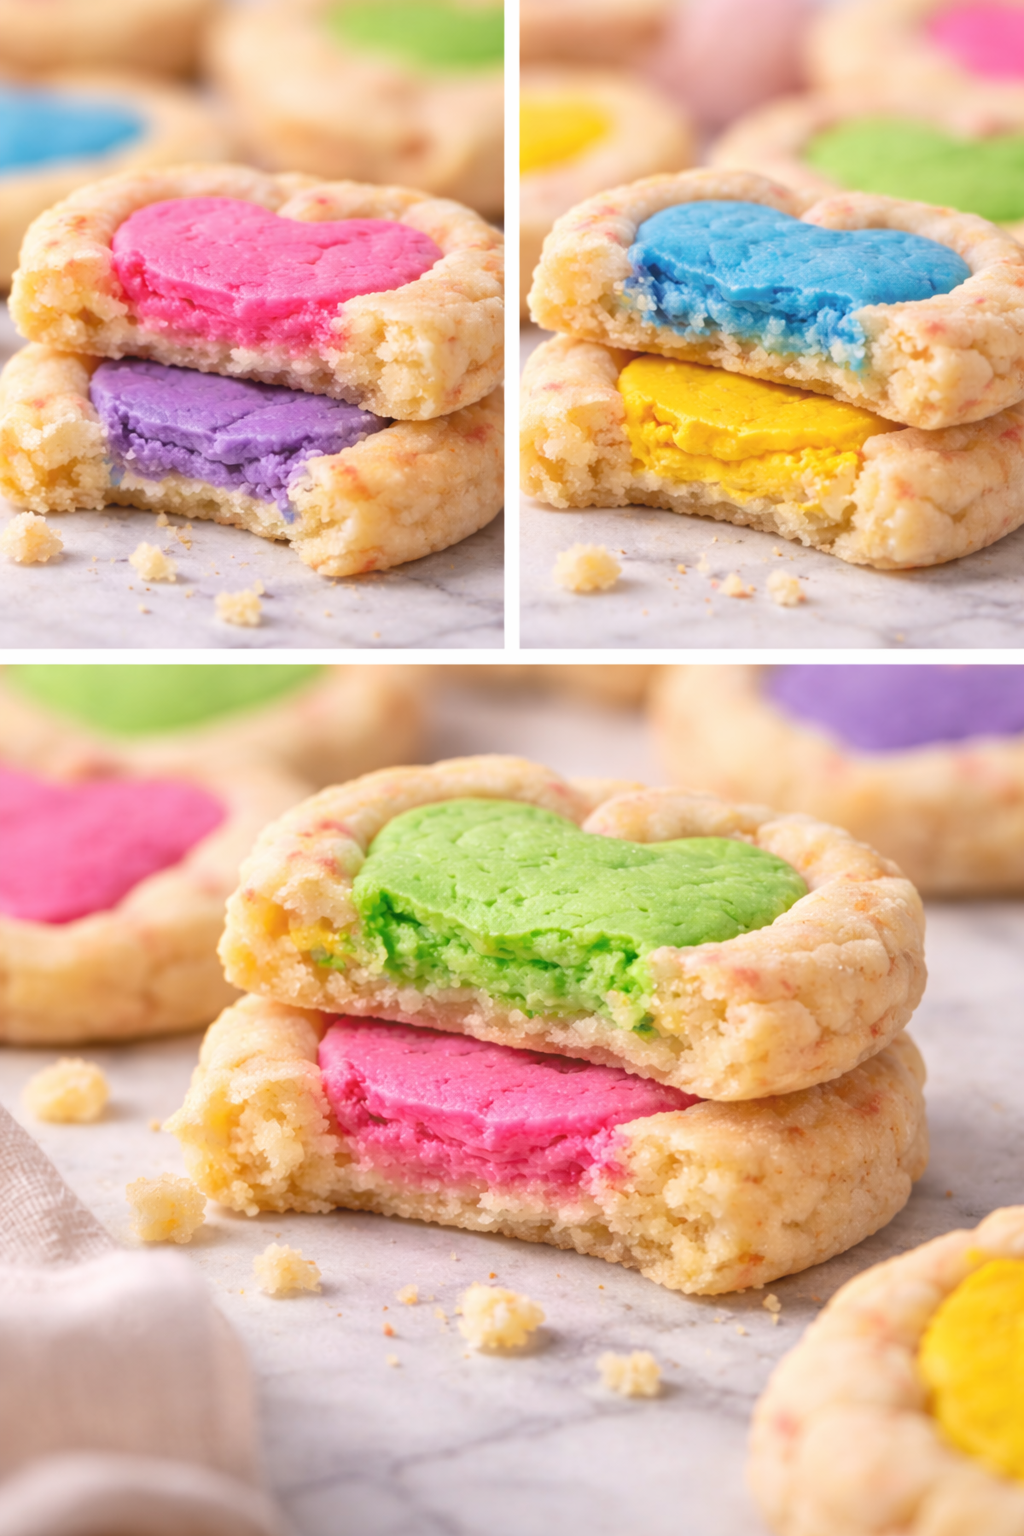
Valentine’s Day and special occasions call for desserts that are both fun and indulgent, and nothing hits that sweet spot quite like Conversation Hearts Cheesecake Cookies. These delightful treats combine soft, buttery cookies with creamy, colorful cheesecake centers — all shaped like little hearts for maximum cuteness. Perfect for gifting, parties, or simply treating yourself, these cookies are as playful as they are delicious.
I first baked these cookies for a Valentine’s Day cookie swap, and I couldn’t believe how the combination of soft cookies and creamy cheesecake won over everyone in the room. The pastel-colored cheesecake filling made each bite a little surprise, and the buttery cookie base kept them comforting and satisfying. Even if you’re new to baking, this recipe is approachable and guides you through every step for picture-perfect results.
Why These Cheesecake Cookies Are a Must-Try
Cheesecake cookies offer something different from ordinary cookies:
Double the Flavor – Soft, buttery cookies paired with smooth, tangy cheesecake.
Vibrant Presentation – Pastel-colored cheesecake fillings create eye-catching desserts perfect for photos and gifting.
Customizable Fun – Swap sprinkles, adjust colors, or even flavor the cheesecake to match any occasion.
Perfect Portion Size – Individually baked hearts make portion control easy while still being indulgent.
Pair them with coffee, tea, or hot chocolate for a sweet treat that feels special and festive.
Ingredients for Conversation Hearts Cheesecake Cookies
For the Cookie Dough:
1 1/2 cups (190 g) all-purpose flour
3/4 cup (150 g) granulated sugar
1/2 tsp baking powder
1/2 tsp baking soda
1/4 tsp salt
1/2 cup (113 g) unsalted butter, softened
1 large egg, room temperature
1/2 tsp vanilla bean paste or extract
Optional: 1 tsp red, pink, or white nonpareils / sprinkles
For the Cheesecake Filling:
454 g (16 oz) cream cheese, softened
200 g (1 cup) granulated sugar
3 large eggs, room temperature
454 g (16 oz) sour cream, room temperature
1 tsp vanilla extract
Pink, purple, blue, green, yellow food coloring gels
Step-by-Step Instructions
1. Preheat the Oven
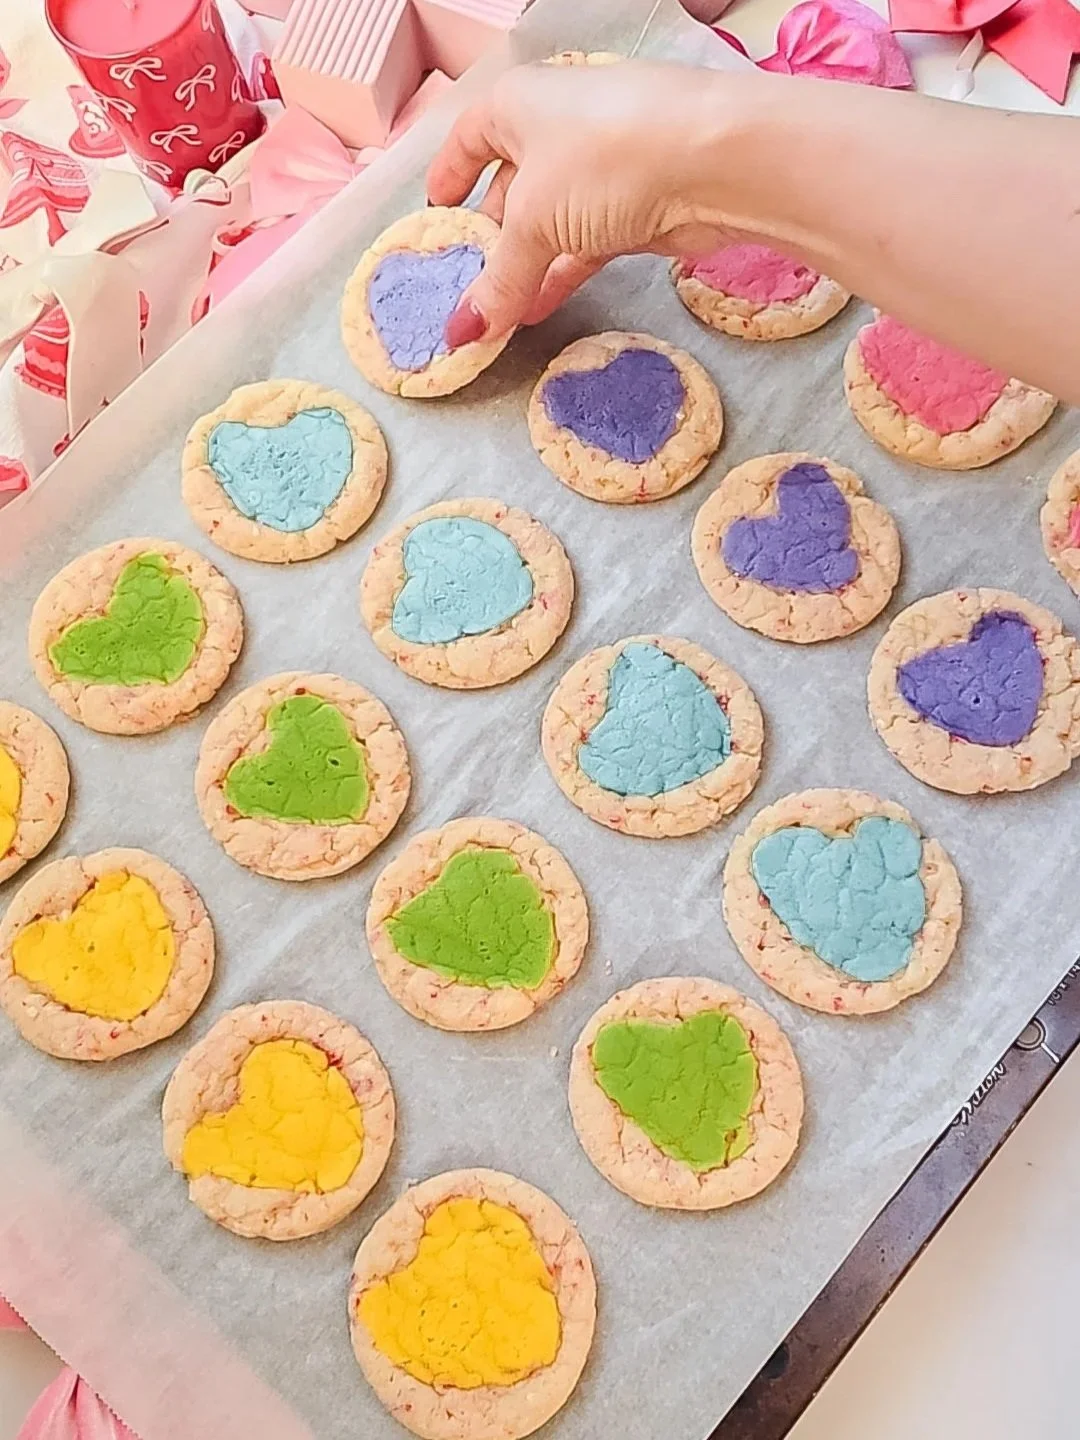
Preheat your oven to 325°F and line a baking sheet with parchment paper. Make sure to leave space between the cookies — about 2 inches — to allow for spreading.
2. Make the Cookie Dough
Sift together flour, baking powder, baking soda, and salt. In a separate bowl, cream the butter until light and fluffy. Add the egg and vanilla, mixing until combined. Gradually add the dry ingredients and fold until just combined. If using sprinkles, fold them in gently.
Pro Tip: Lightly chilling the dough for 10–15 minutes can help maintain the shape when making the heart indentations.
3. Shape the Cookies
Using a medium cookie scooper, portion the dough into balls. Roll lightly in granulated sugar for a sweet crust. Place the balls on the prepared baking sheet. Using a teaspoon or small spatula, press a small heart-shaped indentation into the center of each cookie.
Freeze the cookies for a few minutes while you prepare the cheesecake filling. This prevents the cookies from spreading too much and ensures the cheesecake stays neatly inside.
4. Prepare the Cheesecake Filling
In the bowl of a stand mixer with a whisk attachment, whip the cream cheese for 5 minutes on medium-high speed until smooth and fluffy. Add the sugar and mix for 2–3 minutes until fully incorporated.
Lower the speed and add the eggs, one at a time, mixing each thoroughly before adding the next. Increase to medium-high and whip for an additional minute.
Add sour cream and vanilla, mixing on low until smooth and lump-free (approx. 2–3 minutes). Avoid overmixing to prevent cracking. Tap the bowl on the counter to release any air bubbles.
5. Color the Cheesecake Batter
Divide the cheesecake batter into five bowls. Tint each portion with a different food coloring gel: pink, purple, blue, green, and yellow. Mix gently to ensure even color distribution.
6. Fill the Cookies
Remove the cookie dough from the freezer. Spoon or pipe the colored cheesecake batter into the heart-shaped indentations. Fill each heart generously, but not so full that it spills over.
7. Bake the Cheesecake Cookies
Bake on the middle rack for 14–18 minutes, until the cheesecake tops are no longer glossy, edges of the cookies are set, and the cookie bottoms are lightly golden.
Allow the cookies to cool completely on the baking sheet before transferring them to a wire rack.
8. Chill Before Serving
Refrigerate for at least 1 hour to allow the cheesecake filling to set. Store in an airtight container in the fridge for up to 7 days or freeze for up to 3 months.
Pro Tip: Chilling not only sets the cheesecake but also enhances the flavors and makes slicing the cookies cleaner and easier.
Serving and Presentation
These Conversation Hearts Cheesecake Cookies are perfect for:
Gifting in Valentine’s Day treat boxes
Displaying on a colorful cookie platter for parties
Pairing with a warm drink for a cozy afternoon snack
For extra charm, sprinkle a few nonpareils on top of the cheesecake before baking or serve with a drizzle of melted white chocolate.
FAQs About Conversation Hearts Cheesecake Cookies
Q: Can I use store-bought sprinkles?
Yes! Just fold them in gently to avoid coloring the dough.
Q: Can I make them ahead of time?
Absolutely. Bake the cookies and store in an airtight container, or freeze baked cookies with cheesecake for up to 3 months.
Q: Can I swap food coloring for natural alternatives?
Yes! Beet juice, spirulina, or butterfly pea powder can provide subtle pastel hues, though results may vary.
Q: Can I use flavored cream cheese?
Yes, but reduce added sugar slightly to balance sweetness.
Ready to Make Your Own?
These Conversation Hearts Cheesecake Cookies are a delightful, colorful, and indulgent treat that combine buttery cookies with creamy, pastel cheesecake centers.
With a little patience and this step-by-step guide, you can create cookies that are both beautiful and delicious — perfect for Valentine’s Day, a birthday, or just a sweet surprise for someone special.
So preheat your oven, grab your ingredients, and start baking these charming, irresistible cookies that are sure to brighten any dessert table. Trust me — the first bite will have everyone asking for more!
✅ Pro Tip: For extra fun, mix and match colors in the same batch so every cookie feels unique and festive.

If you loved making my Strawberry Breakfast Buns Roses, there’s so much more waiting for you in my book, Baking Magic: Awaken Your Inner Pastry Chef. It’s packed with simple tricks, pro tips, and show-stopping recipes to help you create unforgettable treats with ease.
Grab your copy on Amazon here and awaken your inner pastry chef today! 🍰✨
Disclaimer: Some links in this post are affiliate links, which means I may earn a small commission if you make a purchase—thank you for supporting my baking projects!

Conversation Hearts Cheesecake Cookies
Valentine’s Day and special occasions call for desserts that are both fun and indulgent, and nothing hits that sweet spot quite like Conversation Hearts Cheesecake Cookies. These delightful treats combine soft, buttery cookies with creamy, colorful cheesecake centers — all shaped like little hearts for maximum cuteness. Perfect for gifting, parties, or simply treating yourself, these cookies are as playful as they are delicious.
Ingredients
- 1 1/2 cups (190 g) all-purpose flour
- 3/4 cup (150 g) granulated sugar
- 1/2 tsp baking powder
- 1/2 tsp baking soda
- 1/4 tsp salt
- 1/2 cup (113 g) unsalted butter, softened
- 1 large egg, room temperature
- 1/2 tsp vanilla bean paste or extract
- Optional: 1 tsp red, pink, or white nonpareils / sprinkles
- 454 g (16 oz) cream cheese, softened
- 200 g (1 cup) granulated sugar
- 3 large eggs, room temperature
- 454 g (16 oz) sour cream, room temperature
- 1 tsp vanilla extract
- Pink, purple, blue, green, yellow food coloring gels
- Preheat the Oven. Preheat your oven to 325°F and line a baking sheet with parchment paper. Make sure to leave space between the cookies — about 2 inches — to allow for spreading.
- Make the Cookie Dough. Sift together flour, baking powder, baking soda, and salt. In a separate bowl, cream the butter until light and fluffy. Add the egg and vanilla, mixing until combined. Gradually add the dry ingredients and fold until just combined. If using sprinkles, fold them in gently.
- Shape the Cookies. Using a medium cookie scooper, portion the dough into balls. Roll lightly in granulated sugar for a sweet crust. Place the balls on the prepared baking sheet. Using a teaspoon or small spatula, press a small heart-shaped indentation into the center of each cookie. Freeze the cookies for a few minutes while you prepare the cheesecake filling. This prevents the cookies from spreading too much and ensures the cheesecake stays neatly inside.
- Prepare the Cheesecake Filling. In the bowl of a stand mixer with a whisk attachment, whip the cream cheese for 5 minutes on medium-high speed until smooth and fluffy. Add the sugar and mix for 2–3 minutes until fully incorporated. Lower the speed and add the eggs, one at a time, mixing each thoroughly before adding the next. Increase to medium-high and whip for an additional minute. Add sour cream and vanilla, mixing on low until smooth and lump-free (approx. 2–3 minutes). Avoid overmixing to prevent cracking. Tap the bowl on the counter to release any air bubbles.
- Color the Cheesecake Batter. Divide the cheesecake batter into five bowls. Tint each portion with a different food coloring gel: pink, purple, blue, green, and yellow. Mix gently to ensure even color distribution.
- Fill the Cookies. Remove the cookie dough from the freezer. Spoon or pipe the colored cheesecake batter into the heart-shaped indentations. Fill each heart generously, but not so full that it spills over.
- Bake the Cheesecake Cookies. Bake on the middle rack for 14–18 minutes, until the cheesecake tops are no longer glossy, edges of the cookies are set, and the cookie bottoms are lightly golden. Allow the cookies to cool completely on the baking sheet before transferring them to a wire rack.
- Chill Before Serving. Refrigerate for at least 1 hour to allow the cheesecake filling to set. Store in an airtight container in the fridge for up to 7 days or freeze for up to 3 months.