
Balloon Heart Black Forest Mousse Cake: An Elegant Valentine’s Showstopper
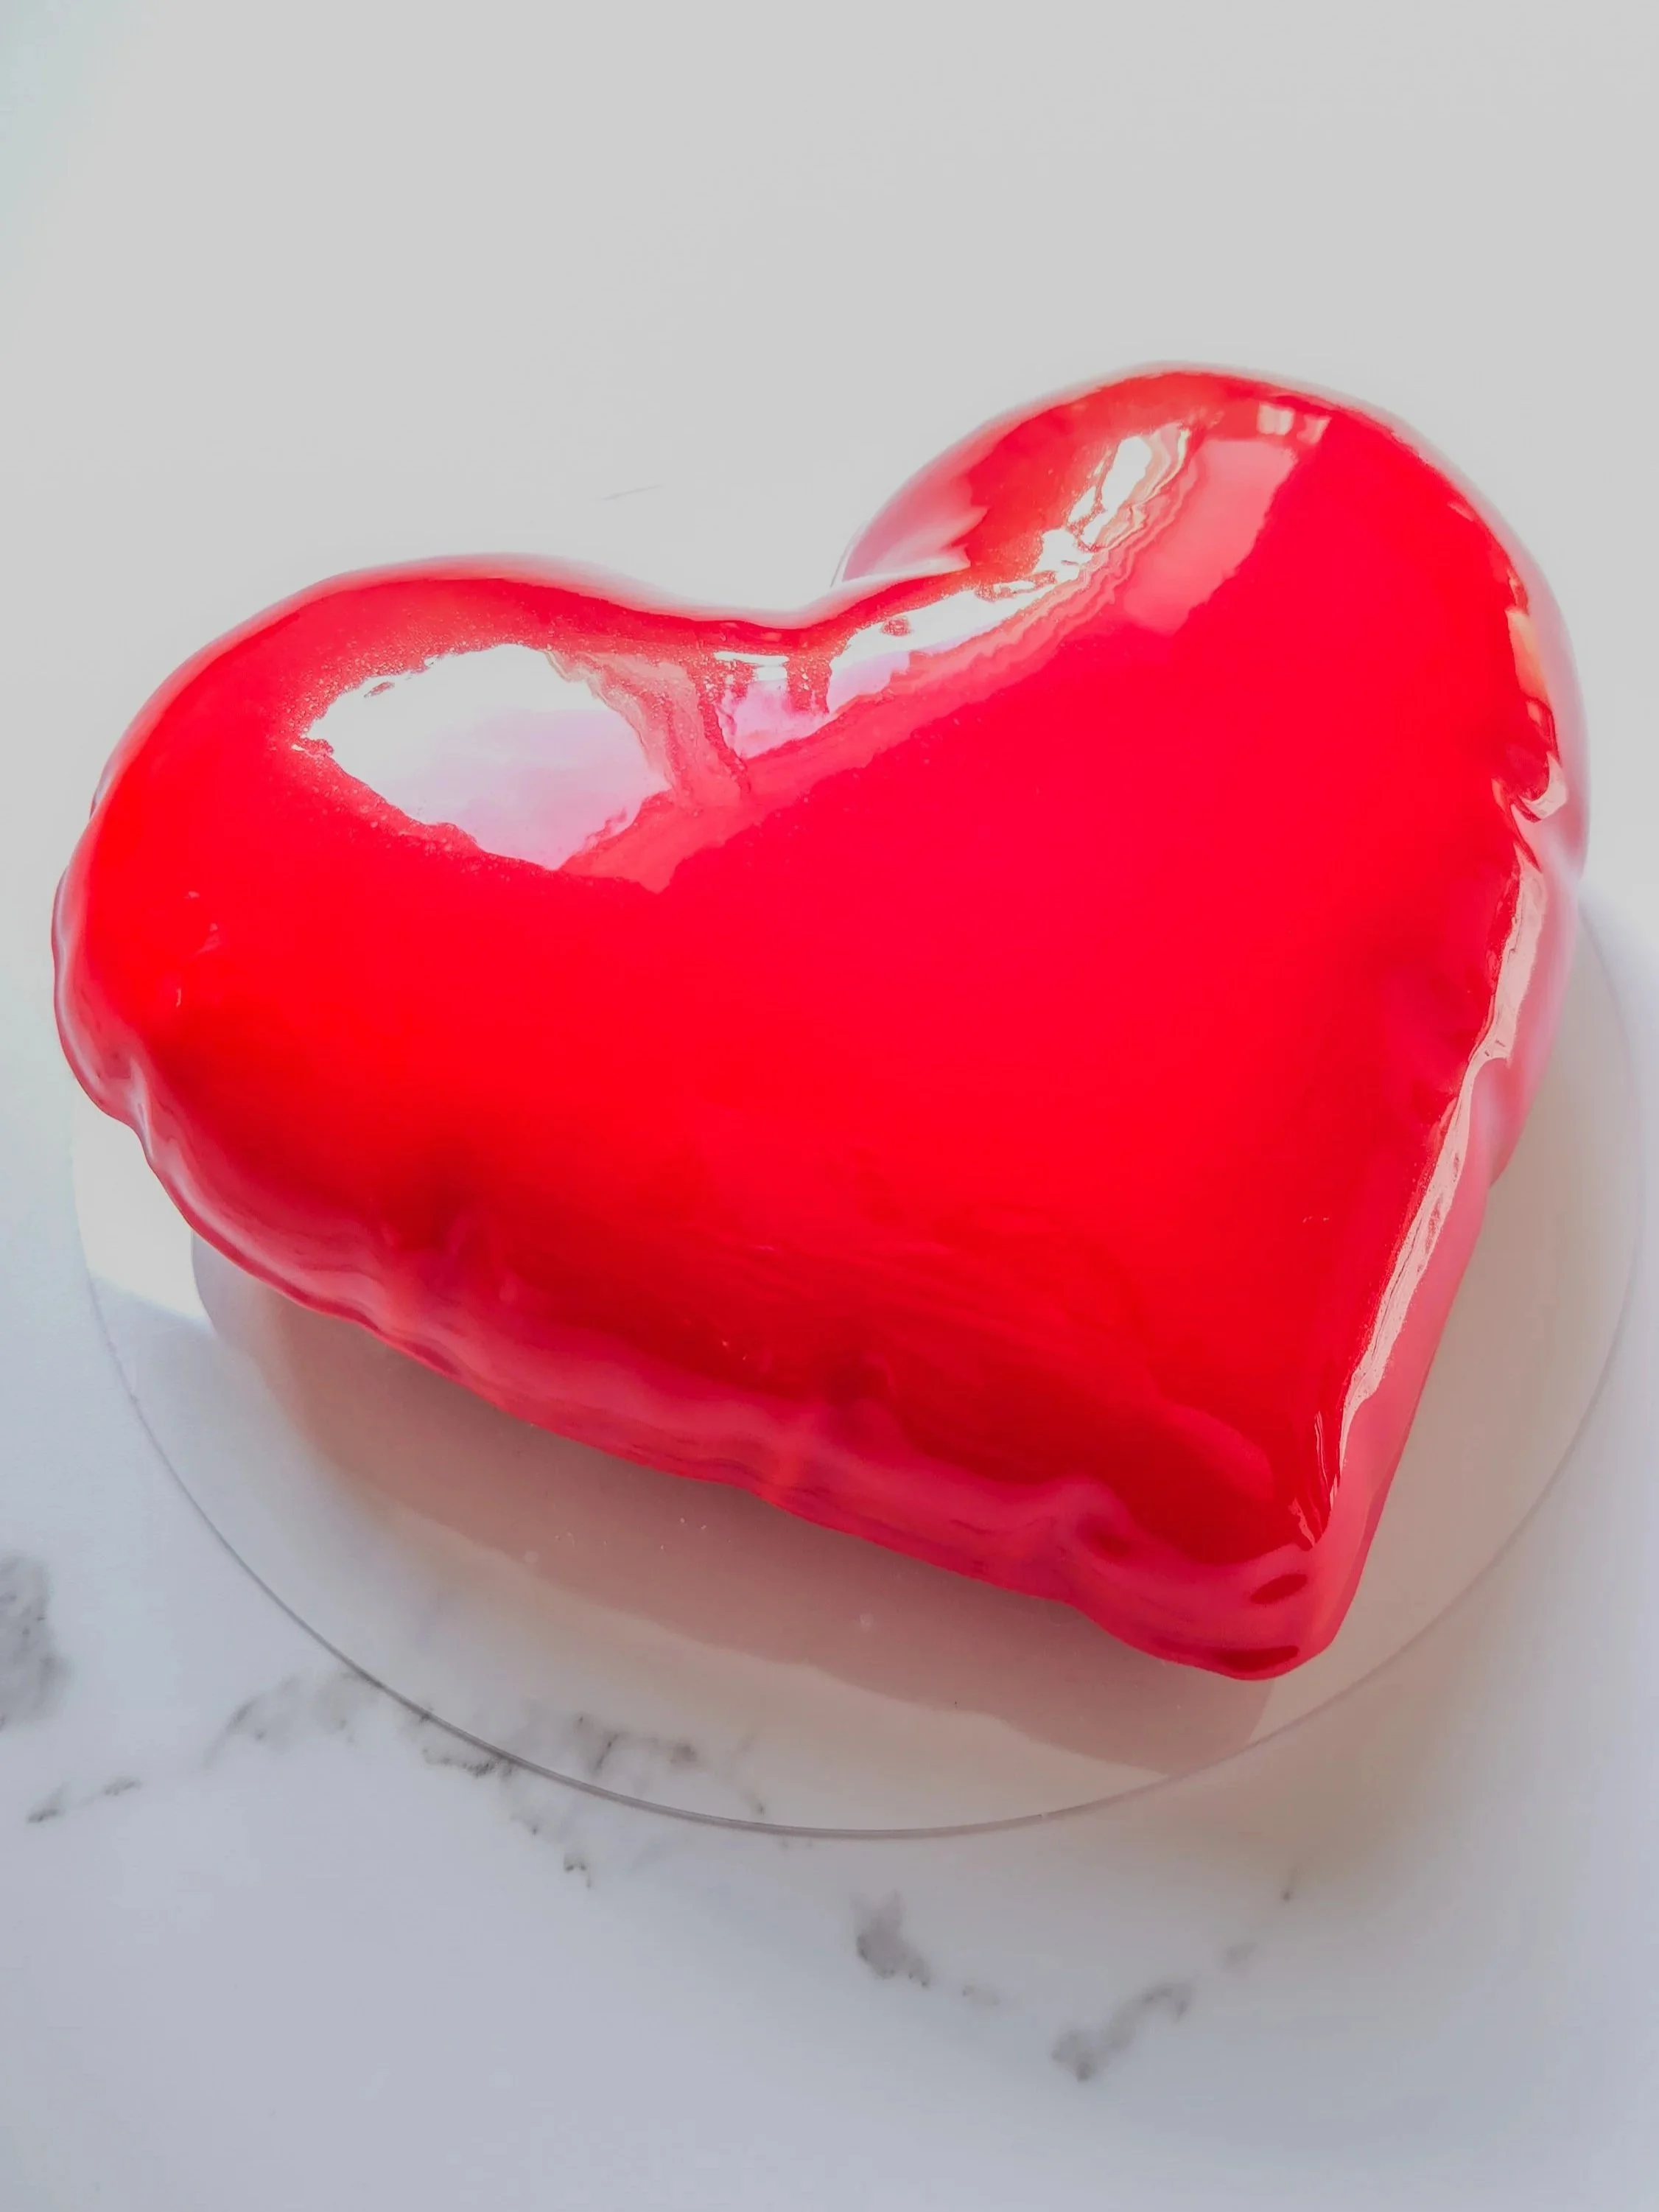
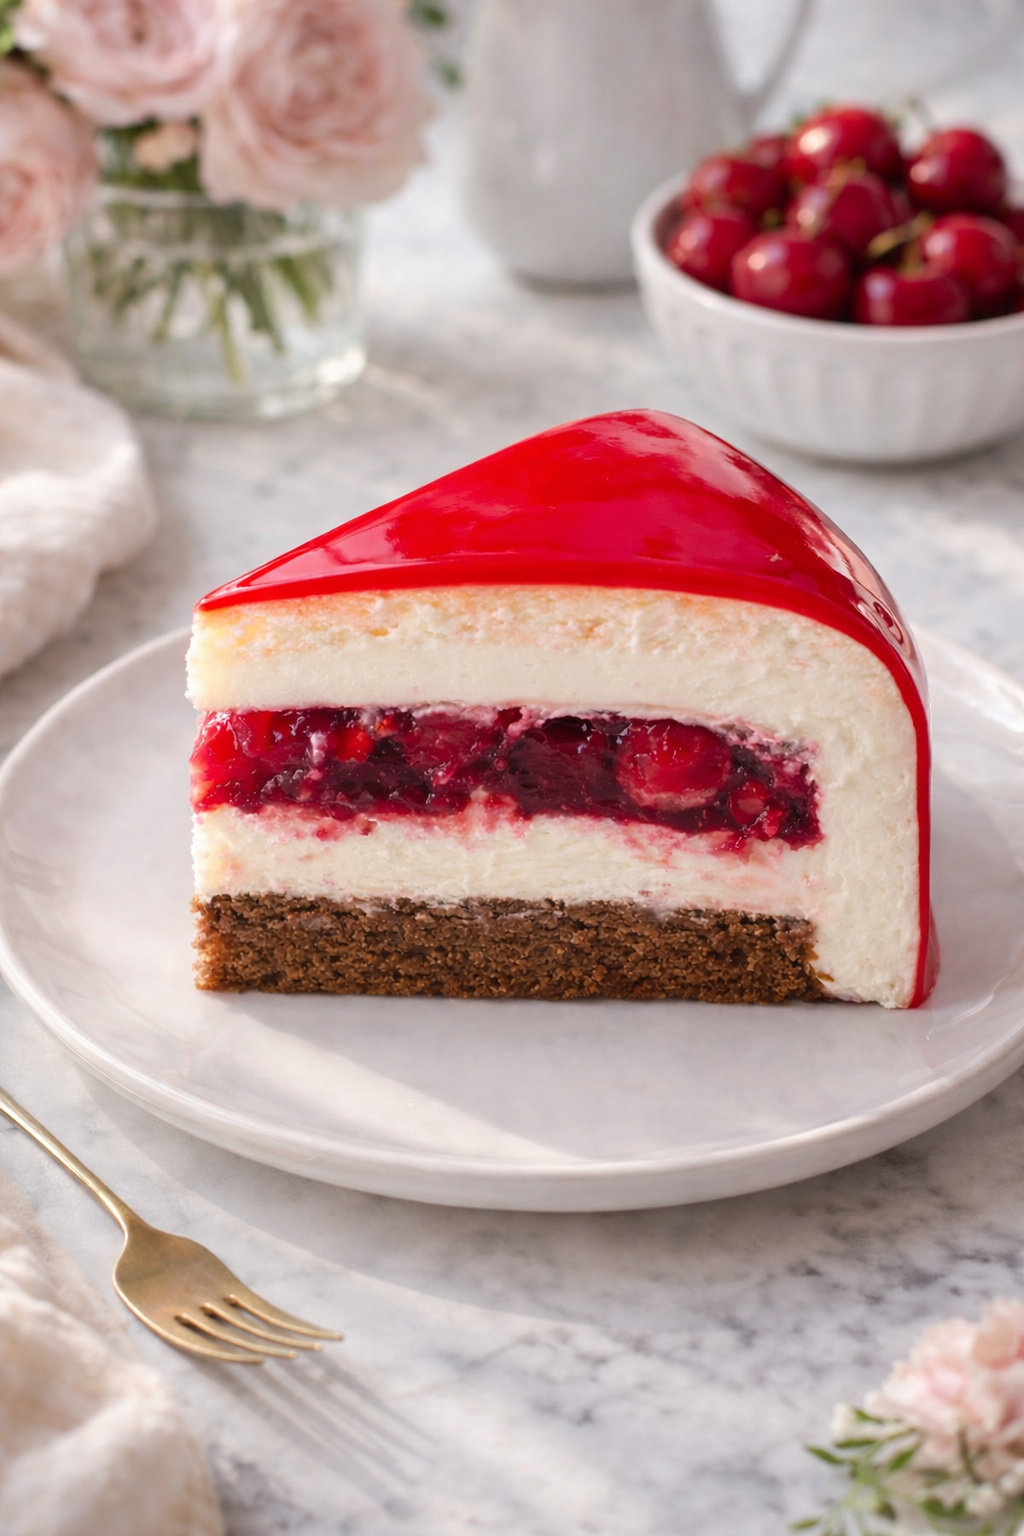
If you’re looking for a dessert that feels truly special, this Balloon Heart Black Forest Mousse Cake delivers drama, elegance, and classic flavor in one stunning centerpiece. Inspired by the timeless Black Forest combination of chocolate and cherries, this modern mousse cake features layers of chocolate sponge, vibrant cherry compote, airy cheesecake mousse, and a glossy red mirror glaze that looks like a floating balloon heart.
It’s the kind of dessert that turns heads the moment it hits the table—perfect for Valentine’s Day, anniversaries, or any celebration where you want to impress without compromise:
This cake isn’t just beautiful—it’s thoughtfully balanced in flavor and texture.
Light Yet Indulgent – Airy mousse paired with rich chocolate sponge
Classic Black Forest Flavors – Chocolate, cherries, and cream in perfect harmony
Mirror Glaze Finish – A smooth, professional bakery-style look
Make-Ahead Friendly – Fully assembled and frozen before glazing
Perfect for Special Occasions – Valentine’s Day, engagements, anniversaries
Despite its elegant appearance, this dessert is very achievable when broken down step by step.
Ingredients for Balloon Heart Black Forest Mousse Cake
Chocolate Sponge Cake
10 g unsweetened cocoa powder
35 g unsalted butter, melted and cooled
75 g granulated sugar
1 large egg
35 g plain Greek yogurt, room temperature
¼ tsp baking powder
45 g all-purpose flour
Cherry Compote
140 g whole sweet cherries (fresh or frozen, defrosted)
50 g sweet cherry purée
15 g granulated sugar
3 g unflavored gelatin
15 g cold water
5 g lemon juice
Cheesecake Mousse
45 g whole milk
130 g cream cheese
3 g unflavored gelatin
15 g cold water
35 g granulated sugar
220 g heavy cream
Red Mirror Glaze
75 g cold water
150 g granulated sugar
150 g light corn syrup
100 g sweetened condensed milk
12 g unflavored gelatin
60 g cold water
150 g white chocolate
Red food coloring gel
Mold
Balloon Heart Silicone Mold: Click here to check out the product
https://amzn.to/4sO1jn8
Step-by-Step Instructions
1. Make the Chocolate Sponge Cake
Preheat the oven to 325°F (165°C). In the bowl of a stand mixer fitted with the whisk attachment, whip the egg and sugar for 2–3 minutes until pale, thick, and fluffy.
Add the cocoa powder, flour, and baking powder, mixing just until combined. Pour in the melted butter and Greek yogurt and mix until smooth.
Transfer the batter into a greased 8-inch round baking pan and bake on the middle rack for 15 minutes, or until a toothpick inserted comes out mostly clean.
Cool completely in the pan, then flip onto plastic wrap, wrap tightly, and refrigerate. Once chilled, cut out a heart shape using the mold cutter. Set aside.
2. Prepare the Cherry Compote
Bloom the gelatin in cold water for 5 minutes. Cut the whole cherries in half.
In a saucepan, combine the cherries, cherry purée, sugar, and lemon juice. Heat just until the mixture begins to boil. Remove from heat and stir in the bloomed gelatin until fully dissolved.
Pour the compote into the heart mold insert and freeze for at least 8 hours or overnight until completely solid.
3. Make the Cheesecake Mousse
Bloom the gelatin in cold water for 5 minutes.
Heat the milk and sugar together in a small saucepan over low heat, stirring until the sugar dissolves. Microwave the cream cheese until softened, then combine it with the warm milk mixture. Microwave the bloomed gelatin for 5–10 seconds until melted, then pour it into the cream cheese and milk mixture. Emulsify with an immersion blender until smooth and glossy. Set aside to cool.
Whip the heavy cream to stiff peaks. Once the cream cheese mixture cools to 35°C (95°F), gently fold it into the whipped cream until fully combined and airy.
4. Assemble the Mousse Cake
Pour half of the cheesecake mousse into the heart silicone mold, spreading it carefully into all the edges to avoid air pockets.
Insert the frozen cherry compote layer. Cover with the remaining mousse.
Gently press the chocolate heart sponge into the mousse so the edges are slightly covered. Smooth the surface with an offset spatula.
Freeze the assembled cake for 8–10 hours or overnight until completely solid.
5. Prepare the Mirror Glaze
Only prepare the glaze once the cake is fully frozen.
Bloom the gelatin in 60 g cold water for 5 minutes. In a saucepan, combine 75 g water, sugar, and corn syrup and bring to a gentle boil.
Remove from heat and add the condensed milk, white chocolate, bloomed gelatin, and red food coloring gel. Emulsify with an immersion blender until smooth.
Allow the glaze to cool to 35°C (95°F) before use.
6. Glaze the Cake
Unmold the frozen mousse cake and place it on a raised glass or bowl over a tray.
Pour the mirror glaze evenly over the cake. Allow it to drip for 2–3 minutes, then gently remove excess drips with a warm, wet spatula or knife.
Transfer the cake to a serving board using a damp offset spatula.
Serving and Storage
Allow the cake to thaw in the refrigerator for 4–6 hours before serving for the best texture.
Storage Tips:
Refrigerator: Up to 3 days, covered
Freezer (unglazed): Up to 1 month
Frequently Asked Questions
Q: Can I make this cake ahead of time?
Yes. This cake is designed to be made in stages and frozen before glazing.
Q: Do I need an immersion blender for the glaze?
Highly recommended for a smooth, bubble-free mirror glaze.
Q: Can I use frozen cherries?
Absolutely. Just thaw and drain them before use.
Q: Why is the glaze poured at 35°C?
This temperature ensures a smooth finish without melting the mousse.
Top 3 Tips for Beginners
Freeze completely between layers
Each component (compote insert, assembled mousse cake) must be fully frozen before moving on. This ensures clean layers and prevents collapse during glazing.Mind the glaze temperature
Pouring the mirror glaze at 35°C (95°F) is key. Hotter glaze can melt the mousse; cooler glaze won’t coat smoothly. Use a thermometer if possible.Work calmly and in stages
This cake is designed to be made over 1–2 days. There’s no need to rush — patience is what gives this cake its clean, professional look.
A Stunning Dessert Worth the Effort
This Balloon Heart Black Forest Mousse Cake is the perfect blend of classic flavor and modern pastry design. With its vibrant red glaze, hidden cherry center, and soft chocolate base, it’s a dessert that feels celebratory, romantic, and unforgettable.
Whether you’re baking for Valentine’s Day or a meaningful celebration, this cake is guaranteed to leave a lasting impression—both visually and deliciously.

If you loved making my Strawberry Breakfast Buns Roses, there’s so much more waiting for you in my book, Baking Magic: Awaken Your Inner Pastry Chef. It’s packed with simple tricks, pro tips, and show-stopping recipes to help you create unforgettable treats with ease.
Grab your copy on Amazon here and awaken your inner pastry chef today! 🍰✨
Disclaimer: Some links in this post are affiliate links, which means I may earn a small commission if you make a purchase—thank you for supporting my baking projects!

Balloon Heart Black Forest Mousse Cake
If you’re looking for a dessert that feels truly special, this Balloon Heart Black Forest Mousse Cake delivers drama, elegance, and classic flavor in one stunning centerpiece. Inspired by the timeless Black Forest combination of chocolate and cherries, this modern mousse cake features layers of chocolate sponge, vibrant cherry compote, airy cheesecake mousse, and a glossy red mirror glaze that looks like a floating balloon heart.
Ingredients
- 10 g unsweetened cocoa powder
- 35 g unsalted butter, melted and cooled
- 75 g granulated sugar
- 1 large egg
- 35 g plain Greek yogurt, room temperature
- ¼ tsp baking powder
- 45 g all-purpose flour
- 140 g whole sweet cherries (fresh or frozen, defrosted)
- 50 g sweet cherry purée
- 15 g granulated sugar
- 3 g unflavored gelatin
- 15 g cold water
- 5 g lemon juice
- 45 g whole milk
- 130 g cream cheese
- 3 g unflavored gelatin
- 15 g cold water
- 35 g granulated sugar
- 220 g heavy cream
- 75 g cold water
- 150 g granulated sugar
- 150 g light corn syrup
- 100 g sweetened condensed milk
- 12 g unflavored gelatin
- 60 g cold water
- 150 g white chocolate
- Red food coloring gel
Instructions
- Preheat the oven to 325°F (165°C). In the bowl of a stand mixer fitted with the whisk attachment, whip the egg and sugar for 2–3 minutes until pale, thick, and fluffy.
- Add the cocoa powder, flour, and baking powder, mixing just until combined. Pour in the melted butter and Greek yogurt and mix until smooth.
- Transfer the batter into a greased 8-inch round baking pan and bake on the middle rack for 15 minutes, or until a toothpick inserted comes out mostly clean.
- Cool completely in the pan, then flip onto plastic wrap, wrap tightly, and refrigerate. Once chilled, cut out a heart shape using the mold cutter. Set aside.
- Bloom the gelatin in cold water for 5 minutes. Cut the whole cherries in half.
- In a saucepan, combine the cherries, cherry purée, sugar, and lemon juice. Heat just until the mixture begins to boil. Remove from heat and stir in the bloomed gelatin until fully dissolved.
- Pour the compote into the heart mold insert and freeze for at least 8 hours or overnight until completely solid.
- Bloom the gelatin in cold water for 5 minutes.
- Heat the milk and sugar together in a small saucepan over low heat, stirring until the sugar dissolves. Microwave the cream cheese until softened, then combine it with the warm milk mixture. Microwave the bloomed gelatin for 5–10 seconds until melted, then pour it into the cream cheese and milk mixture. Emulsify with an immersion blender until smooth and glossy. Set aside to cool.
- Whip the heavy cream to stiff peaks. Once the cream cheese mixture cools to 35°C (95°F), gently fold it into the whipped cream until fully combined and airy.
- Pour half of the cheesecake mousse into the heart silicone mold, spreading it carefully into all the edges to avoid air pockets.
- Insert the frozen cherry compote layer. Cover with the remaining mousse.
- Gently press the chocolate heart sponge into the mousse so the edges are slightly covered. Smooth the surface with an offset spatula.
- Freeze the assembled cake for 8–10 hours or overnight until completely solid.
- Only prepare the glaze once the cake is fully frozen.
- Bloom the gelatin in 60 g cold water for 5 minutes. In a saucepan, combine 75 g water, sugar, and corn syrup and bring to a gentle boil.
- Remove from heat and add the condensed milk, white chocolate, bloomed gelatin, and red food coloring gel. Emulsify with an immersion blender until smooth.
- Allow the glaze to cool to 35°C (95°F) before use.
- Unmold the frozen mousse cake and place it on a raised glass or bowl over a tray.
- Pour the mirror glaze evenly over the cake. Allow it to drip for 2–3 minutes, then gently remove excess drips with a warm, wet spatula or knife.
- Transfer the cake to a serving board using a damp offset spatula.