
Peach Mousse Fruit Illusion Cake with Earl Grey Mousse
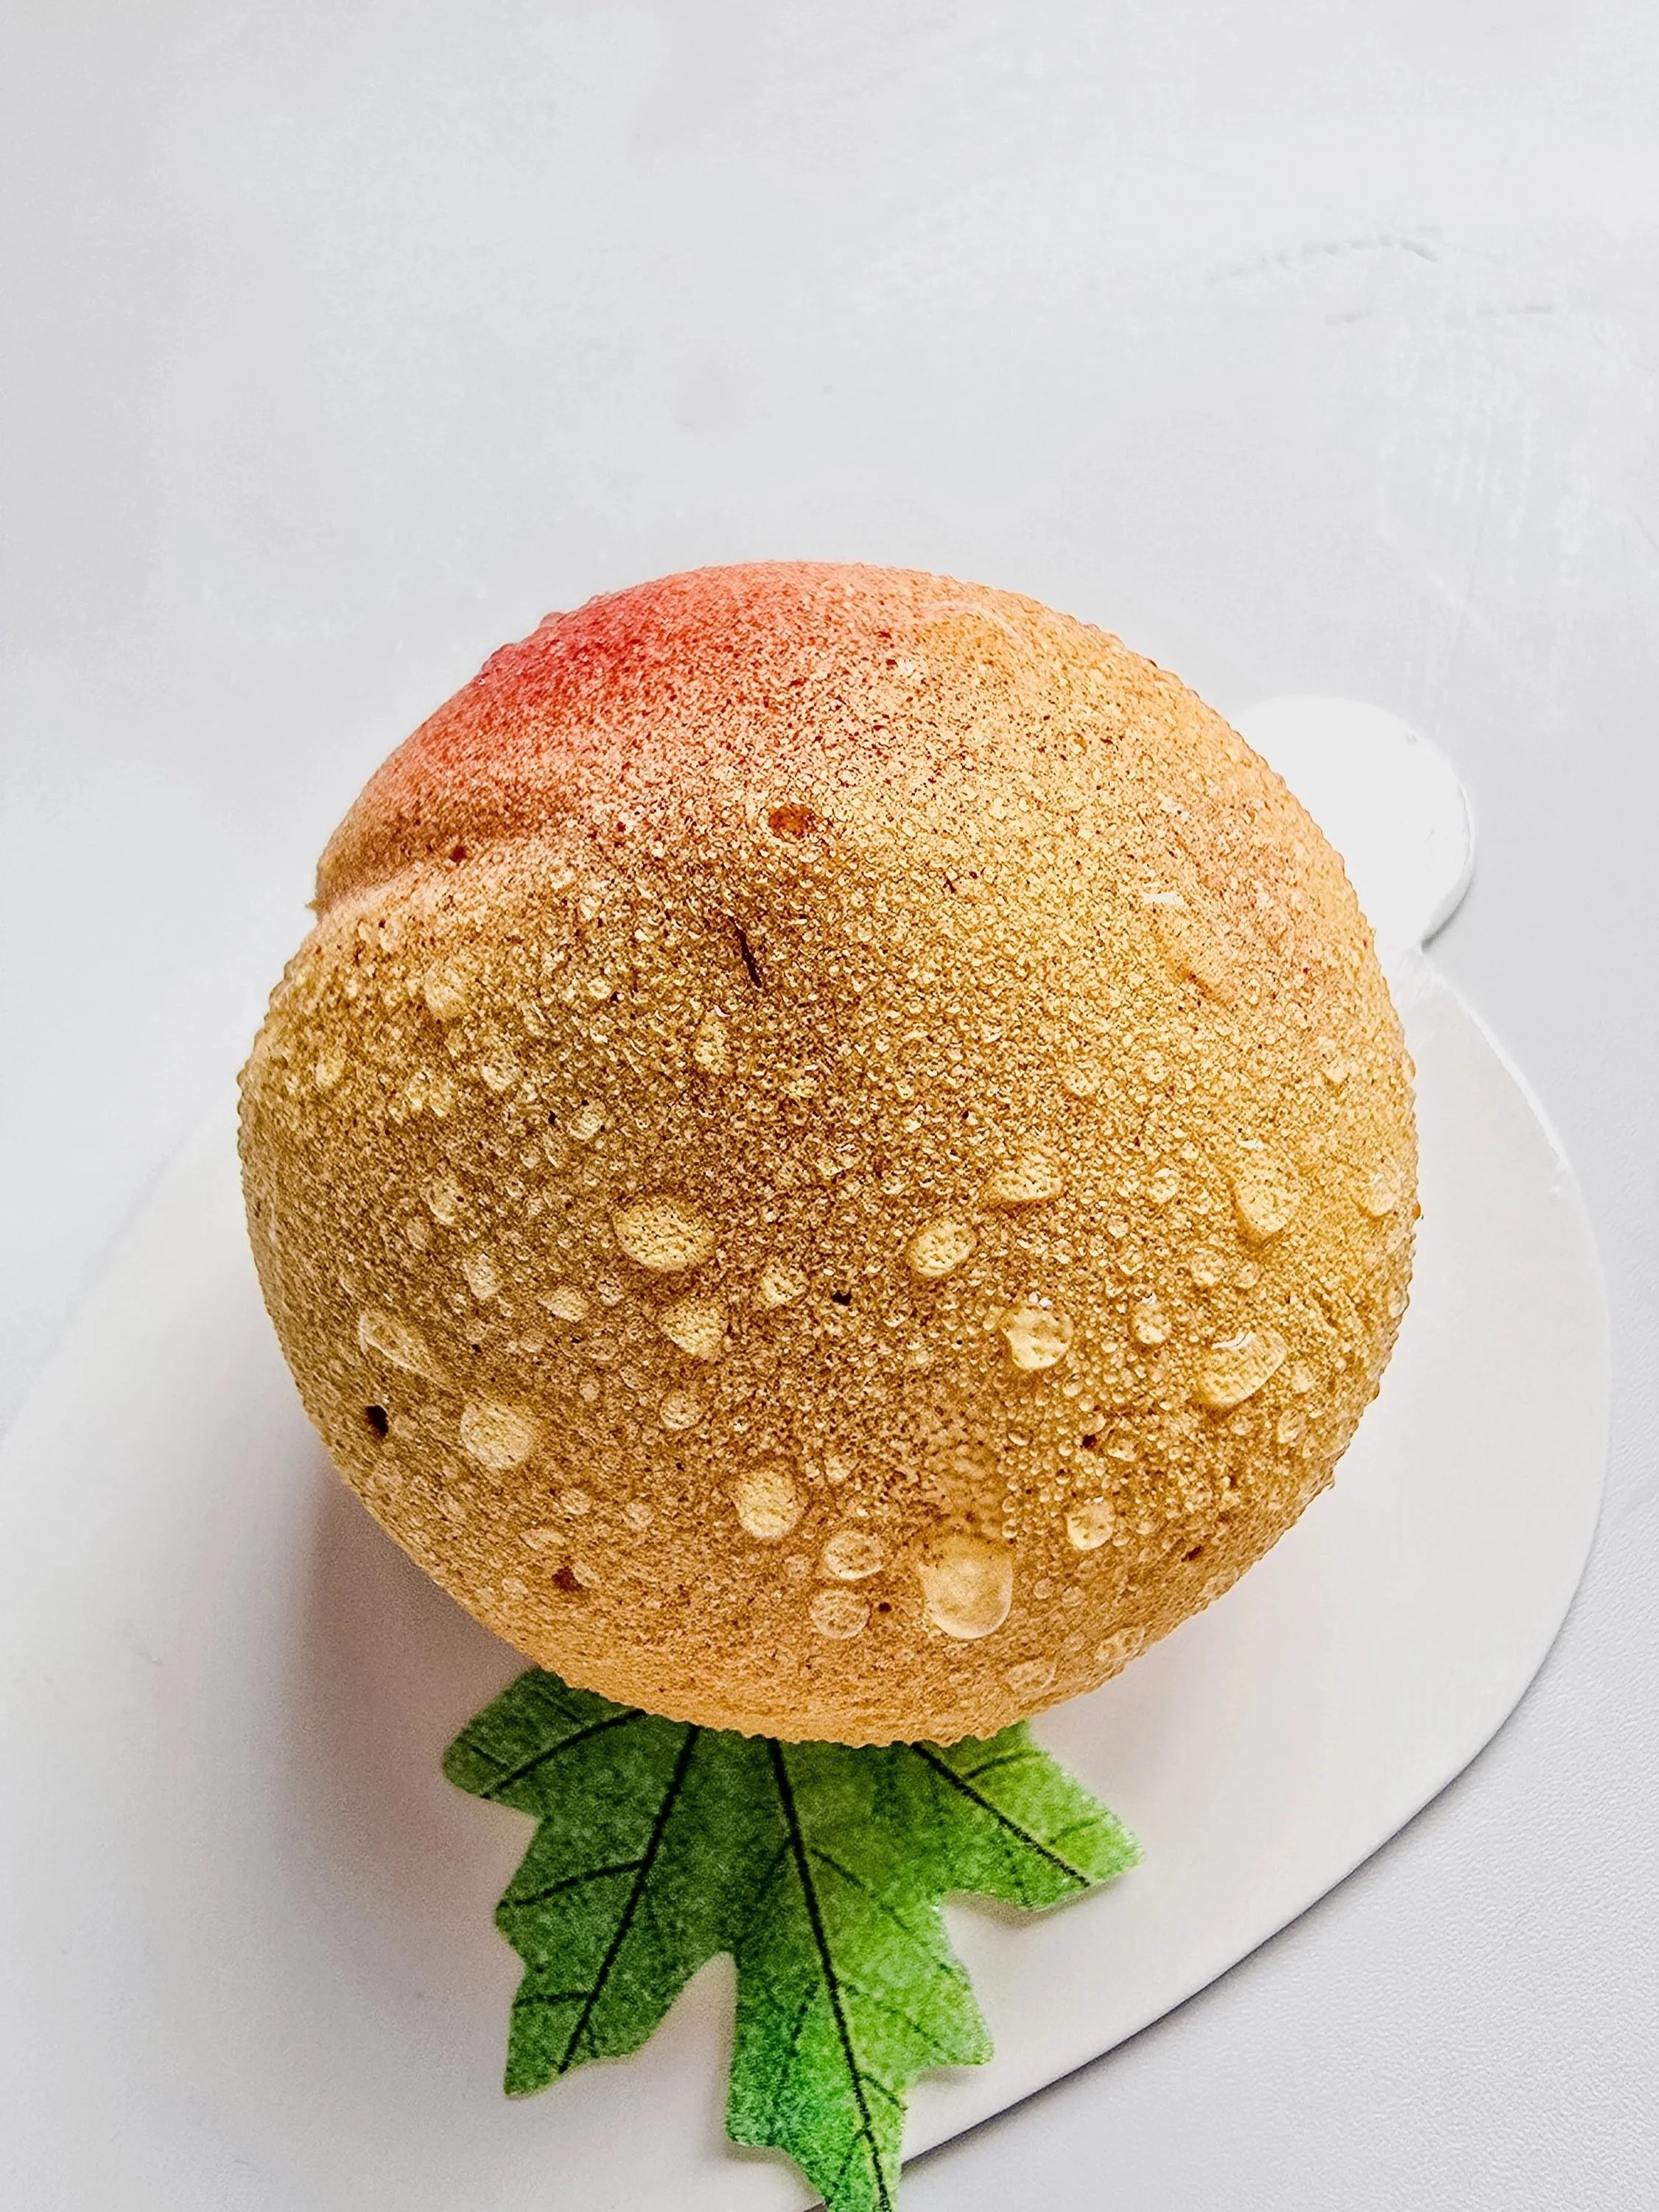
A refined entremet that looks like a real peach—delicate, elegant, and bursting with flavor
There’s something undeniably romantic about peaches. Soft, fragrant, gently sweet, and nostalgic, they evoke summer afternoons, handwritten recipes, and the kind of desserts that feel both comforting and elevated. This Peach Mousse Fruit Illusion Cake captures that essence perfectly—combining a silky Earl Grey mousse, a bright peach center, and a light almond dacquoise base, all finished with a glossy fruit glaze or velvet shell that mimics a real peach.
If you love entremets, illusion cakes, or modern French pastry techniques, this dessert is a must-try. While it looks like something from a high-end pâtisserie, this guide walks you through each component step by step so you can recreate it with confidence:
This dessert is carefully balanced in both flavor and texture:
Real peach flavor from a natural fruit center
Earl Grey mousse for subtle floral depth
Almond dacquoise base that’s light yet structured
Professional finish using mirror glaze or velvet spray
Ideal for make-ahead desserts and special occasions
It’s visually striking, but more importantly, it’s thoughtfully composed so no single element overwhelms the others.
Peach Centers
The peach center adds brightness and gentle acidity, cutting through the richness of the mousse. Sweetness is kept intentionally restrained to maintain balance throughout the dessert.
Ingredients
2 ripe peaches, peeled and chopped
1 tsp lemon juice
1 tbsp granulated sugar (adjust to taste)
½ tsp cornstarch
Instructions
In a small bowl, combine the sugar and cornstarch.
Add the peaches and lemon juice to a saucepan, then sprinkle the sugar mixture over the fruit.
Cook over low-medium heat until the peaches soften and release their juices.
Remove from heat and purée using an immersion blender until smooth.
Return the mixture to low heat and simmer gently until thickened.
Strain into a heatproof container for a smooth, refined texture.
Allow to cool slightly, then pour into 1-inch silicone half-sphere molds.
Freeze until fully firm, at least 3–4 hours or overnight.
Pro Tip: Use ripe, fragrant peaches whenever possible. Flavor matters more than sweetness here, and over-sugaring will dull the natural fruit character.
Almond Dacquoise Base
This almond dacquoise provides a light yet stable foundation for the mousse cake. It’s airy, gently nutty, and far less dense than sponge cake—ideal for modern entremets.
Ingredients
60 g egg whites (from 2 eggs)
50 g granulated sugar
50 g almond flour
15 g powdered sugar
10 g all-purpose flour
Instructions
Preheat the oven to 340°F (170°C).
Whip the egg whites and granulated sugar on low-medium speed until foamy, then increase to medium speed and whip until stiff peaks form.
Gently fold in the almond flour, powdered sugar, and all-purpose flour until just combined.
Transfer the batter to a piping bag fitted with a 0.5 cm round tip (Wilton 10 or 11).
Pipe circles roughly the same diameter as your molds onto parchment paper or a macaron silicone mat.
Bake for about 15 minutes, or until lightly golden and dry to the touch.
Cool completely on the baking sheet before use.
Earl Grey Mousse
This mousse is the heart of the cake—light, creamy, and delicately perfumed with Earl Grey tea. The bergamot aroma enhances the peach without competing with it.
Ingredients
200 g heavy cream, cold
100 ml whole milk
2 Earl Grey tea bags (or 2 tsp loose tea)
2 egg yolks
30 g granulated sugar
3 g unflavored gelatin powder
12 g cold water
¼ tsp vanilla extract
Instructions
Bloom the gelatin in cold water for 10 minutes.
Heat the milk gently and infuse with Earl Grey tea for 10 minutes; remove tea bags.
In a separate bowl, whisk egg yolks and sugar until pale.
Slowly pour the warm infused milk into the yolks while whisking constantly.
Return the mixture to the saucepan and cook gently, stirring continuously, until it coats the back of a spoon (about 82°C / 180°F).
Remove from heat and stir in the bloomed gelatin until fully dissolved.
Add vanilla extract and allow the mixture to cool to room temperature.
Whip the heavy cream to soft peaks and gently fold it into the cooled tea custard.
Transfer the mousse to a tipless piping bag.
Assembly
This is where the dessert takes shape. Work calmly and deliberately for clean layers.
Pipe Earl Grey mousse into silicone molds, filling them halfway.
Insert a frozen peach center into each mold.
Fill the remaining space with mousse and smooth the surface.
Place an almond dacquoise round on top—this becomes the base once unmolded.
Freeze overnight, or until completely solid.
Note: Full freezing is essential for clean demolding and a flawless finish.
Mirror Glaze or Fruit Glaze (Optional)
To complete the illusion, you can finish the cakes with a mirror glaze, fruit glaze, or chocolate velvet spray.
Ingredients
100 g white chocolate, chopped
100 g sweetened condensed milk
100 g granulated sugar
50 ml water
6 g gelatin (sheets or powder)
Pink or peach food coloring
Optional: Neutral glaze blended with peach purée for a lighter fruit finish
Instructions
Bloom the gelatin.
Heat sugar, water, and condensed milk until just simmering.
Remove from heat and add white chocolate and gelatin.
Stir until smooth and emulsified.
Color as desired.
Cool the glaze to 95°F (35°C) before pouring over frozen cakes.
Finishing Options
Mirror Glaze: Smooth, glossy, and elegant
Fruit Glaze: Softer, more natural peach appearance
Chocolate Velvet Spray: Matte finish that closely mimics real peach skin
Using colored cocoa butter with an airbrush allows you to add blush tones and subtle variation for a highly realistic effect.
Recommended Molds & Tools
Silicone molds: Click here to check out products
https://amzn.to/463JneZ
https://amzn.to/45HsgzL
Colored cocoa butters and airbrush: Click here to check out products
https://amzn.to/45MjA9L
https://amzn.to/3UIHBcR
Chocolate velvet spray option: Click here to check out products
https://amzn.to/460FFmp
Make-Ahead and Storage Tips
These cakes keep well frozen for up to two weeks before glazing.
Once finished, thaw in the refrigerator for 4–6 hours before serving.
Serve chilled, not cold, to allow the mousse and fruit flavors to fully express themselves.
FAQs for Peach Mousse Fruit Illusion Cake
Q: Can I make this Peach Mousse Fruit Illusion Cake in advance?
Yes. This entremet is designed to be made ahead. You can fully assemble and freeze the cakes (without glaze) for up to 2 weeks. Apply the glaze while frozen, then thaw in the refrigerator for 4–6 hours before serving.
Q: Do I need a silicone mold?
Yes. A peach-shaped silicone mold is essential for the illusion effect and clean demolding.
Q: Can I substitute the Earl Grey?
Yes. Good alternatives include:
Jasmine tea
Chamomile
Vanilla bean
Light honey infusion
Avoid overly strong or smoky teas.
Q: Why does my mousse feel too soft?
Common causes include:
Folding whipped cream into a warm base
Improperly bloomed or overheated gelatin
Over-whipped cream
Q: Can I skip the gelatin?
No. Gelatin is essential for structure in this recipe.
Q: Mirror glaze vs velvet spray?
Mirror glaze = glossy, elegant
Velvet spray = matte, realistic peach skin
Pro Tips for Beginners
Even though this cake looks like a pâtisserie showpiece, these tips will help set you up for success:
Plan your timing: Prepare inserts, base, and mousse in stages to reduce stress.
Temperature matters: Let the mousse base cool before folding in whipped cream, and always glaze fully frozen cakes.
Gelatin care: Bloom properly and melt gently—never boil.
Whip cream correctly: Soft peaks only.
Be patient: Clean layers and realistic finishes come from working slowly.
Top 3 Tips for First-Time Entremet Bakers
Freeze fully between every stage
If something feels soft, it needs more freezer time.Temperature control beats speed
Rushing is the most common cause of mousse failure.Make this over two days
Better structure, better results, less stress.
Make Your Own Peach Mousse Fruit Illusion Cake
This Peach Mousse Fruit Illusion Cake with Earl Grey Mousse is more than a dessert—it’s an experience. With thoughtful preparation, proper freezing, and attention to detail, you’ll achieve a stunning result that tastes as good as it looks.
Perfection isn’t the goal—real peaches have variation, depth, and charm. Enjoy the process, and you’ll create a cake that truly wows.

If you loved making my Strawberry Breakfast Buns Roses, there’s so much more waiting for you in my book, Baking Magic: Awaken Your Inner Pastry Chef. It’s packed with simple tricks, pro tips, and show-stopping recipes to help you create unforgettable treats with ease.
Grab your copy on Amazon here and awaken your inner pastry chef today! 🍰✨
Disclaimer: Some links in this post are affiliate links, which means I may earn a small commission if you make a purchase—thank you for supporting my baking projects!

Peach Mousse Fruit Illusion Cake with Earl Grey Mousse
A refined entremet that looks like a real peach—delicate, elegant, and bursting with flavor. There’s something undeniably romantic about peaches. Soft, fragrant, gently sweet, and nostalgic, they evoke summer afternoons, handwritten recipes, and the kind of desserts that feel both comforting and elevated. This Peach Mousse Fruit Illusion Cake captures that essence perfectly—combining a silky Earl Grey mousse, a bright peach center, and a light almond dacquoise base, all finished with a glossy fruit glaze or velvet shell that mimics a real peach.
Ingredients
- 2 ripe peaches, peeled and chopped
- 1 tsp lemon juice
- 1 tbsp granulated sugar (adjust to taste)
- ½ tsp cornstarch
- 60 g egg whites (from 2 eggs)
- 50 g granulated sugar
- 50 g almond flour
- 15 g powdered sugar
- 10 g all-purpose flour
- 200 g heavy cream, cold
- 100 ml whole milk
- 2 Earl Grey tea bags (or 2 tsp loose tea)
- 2 egg yolks
- 30 g granulated sugar
- 3 g unflavored gelatin powder
- 12 g cold water
- ¼ tsp vanilla extract
- 100 g white chocolate, chopped
- 100 g sweetened condensed milk
- 100 g granulated sugar
- 50 ml water
- 6 g gelatin (sheets or powder)
- Pink or peach food coloring
Instructions
- In a small bowl, combine the sugar and cornstarch.
- Add the peaches and lemon juice to a saucepan, then sprinkle the sugar mixture over the fruit.
- Cook over low-medium heat until the peaches soften and release their juices.
- Remove from heat and purée using an immersion blender until smooth.
- Return the mixture to low heat and simmer gently until thickened.
- Strain into a heatproof container for a smooth, refined texture.
- Allow to cool slightly, then pour into 1-inch silicone half-sphere molds.
- Freeze until fully firm, at least 3–4 hours or overnight.
- Pro Tip: Use ripe, fragrant peaches whenever possible. Flavor matters more than sweetness here, and over-sugaring will dull the natural fruit character.
- Preheat the oven to 340°F (170°C).
- Whip the egg whites and granulated sugar on low-medium speed until foamy, then increase to medium speed and whip until stiff peaks form.
- Gently fold in the almond flour, powdered sugar, and all-purpose flour until just combined.
- Transfer the batter to a piping bag fitted with a 0.5 cm round tip (Wilton 10 or 11).
- Pipe circles roughly the same diameter as your molds onto parchment paper or a macaron silicone mat.
- Bake for about 15 minutes, or until lightly golden and dry to the touch.
- Cool completely on the baking sheet before use.
- Bloom the gelatin in cold water for 10 minutes.
- Heat the milk gently and infuse with Earl Grey tea for 10 minutes; remove tea bags.
- In a separate bowl, whisk egg yolks and sugar until pale.
- Slowly pour the warm infused milk into the yolks while whisking constantly.
- Return the mixture to the saucepan and cook gently, stirring continuously, until it coats the back of a spoon (about 82°C / 180°F).
- Remove from heat and stir in the bloomed gelatin until fully dissolved.
- Add vanilla extract and allow the mixture to cool to room temperature.
- Whip the heavy cream to soft peaks and gently fold it into the cooled tea custard.
- Transfer the mousse to a tipless piping bag.
- Pipe Earl Grey mousse into silicone molds, filling them halfway.
- Insert a frozen peach center into each mold.
- Fill the remaining space with mousse and smooth the surface.
- Place an almond dacquoise round on top—this becomes the base once unmolded.
- Freeze overnight, or until completely solid.
- Note: Full freezing is essential for clean demolding and a flawless finish.
- Bloom the gelatin.
- Heat sugar, water, and condensed milk until just simmering.
- Remove from heat and add white chocolate and gelatin.
- Stir until smooth and emulsified.
- Color as desired.
- Cool the glaze to 95°F (35°C) before pouring over frozen cakes.