
Conversation Hearts Mini Cheesecakes: The Perfect Bite-Sized Valentine’s Treat
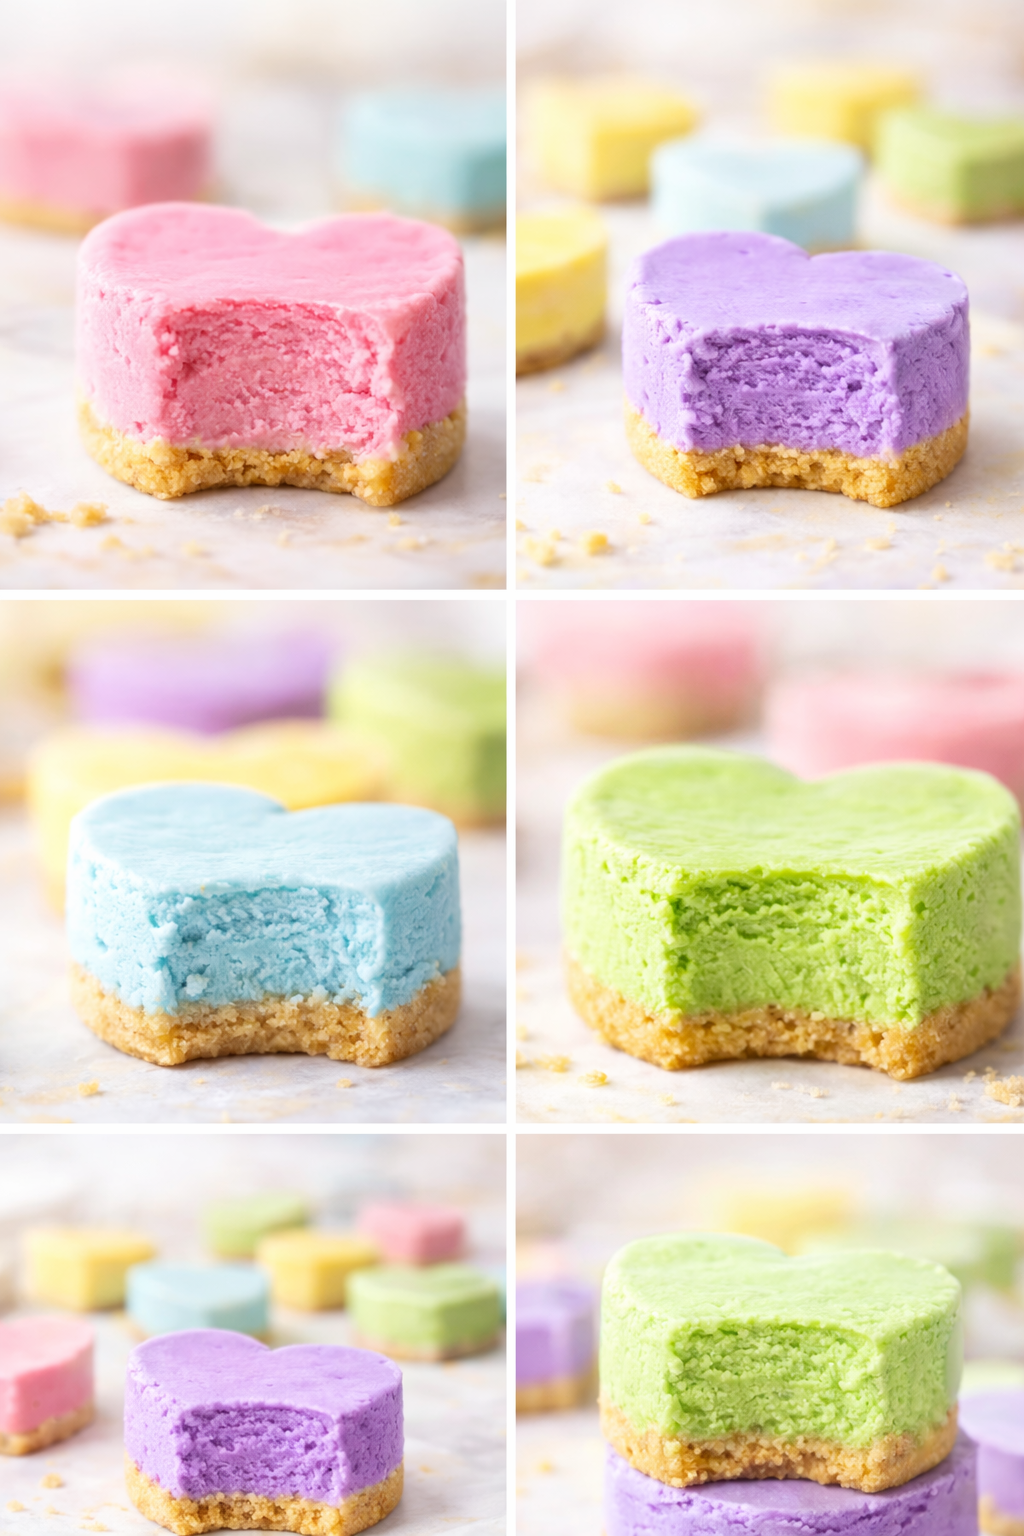
Valentine’s Day calls for sweet gestures, but sometimes a simple box of chocolates just doesn’t cut it. Enter Conversation Hearts Mini Cheesecakes — a playful, colorful, and utterly delicious twist on traditional cheesecakes. These bite-sized desserts combine a buttery graham cracker crust, creamy cheesecake filling, and vibrant pastel colors reminiscent of classic conversation hearts. Perfect for parties, gifting, or just indulging yourself, this recipe is as fun to make as it is to eat.
I first made these mini cheesecakes for a Valentine’s brunch with friends, and let me tell you — they disappeared faster than you can say “sweetheart candy.” The little pops of color, the creamy texture, and the perfect hint of cinnamon in the crust made everyone smile. Whether you’re an experienced baker or a complete beginner, these cheesecakes are a delight to make and even more delightful to eat.
In this post, we’ll cover everything you need: ingredients, step-by-step directions, pro tips, and storage advice. By the end, you’ll be ready to create picture-perfect mini cheesecakes that will wow your family, friends, or even just yourself.
Mini cheesecakes aren’t just cute — they’re practical, customizable, and downright delicious. Here’s why they’re such a hit:
Portion Control – Each mini cheesecake is the perfect bite-sized indulgence. You can satisfy a sweet craving without going overboard.
Aesthetic Appeal – The pastel colors and heart-inspired shapes are visually stunning and perfect for Instagram-worthy dessert spreads.
Customization – Want a hint of lemon, a swirl of chocolate, or a sprinkle of candy? Mini cheesecakes make it easy to personalize each one.
Convenience – No slicing, no messy plates — just grab a cheesecake and enjoy.
Pair them with coffee, a glass of sparkling rosé, or even hot chocolate, and you have a dessert that’s both intimate and indulgent.
Ingredients for Conversation Hearts Mini Cheesecakes
This recipe makes about 15 mini cheesecakes, depending on your mold. You’ll need ingredients for both the crust and the cheesecake filling.
For the Crust:
105 g (approx. 15 squares) graham crackers
55 g (1/2 stick) unsalted butter, melted and cooled
1/4 tsp ground cinnamon
For the Cheesecake:
454 g (16 oz) cream cheese, softened
200 g (1 cup) granulated sugar
3 large eggs, room temperature
454 g (16 oz) sour cream, room temperature
1 tsp vanilla extract
Pink, purple, blue, green, yellow food coloring gels
Mold Recommendation: Mini Cheesecake Silicone Mold – perfect for uniform shapes and easy release. Click here to check out the product Mold

Step-by-Step Instructions
1. Prepare the Crust
Preheat your oven to 325°F. In a food processor, blend the graham crackers until finely ground. Add the cooled melted butter and cinnamon, pulsing just until combined.
Using a teaspoon, ice cream scooper, or shot glass, press approximately 1 teaspoon of crust into each mold cavity. Smooth with the back of your spoon or fingers. Freeze the mold while you prepare the cheesecake batter — this ensures the crust sets and won’t crumble when baked.
Pro Tip: Freezing the crust also prevents sogginess and helps create a neat, defined base for your mini cheesecakes.
2. Make the Cheesecake Filling
In the bowl of a stand mixer fitted with a whisk attachment, whip the cream cheese for 5 minutes on medium-high speed until light, fluffy, and smooth. Add the sugar and mix on medium speed for 2–3 minutes until fully incorporated.
Lower the mixer speed and add the eggs, one at a time, mixing each thoroughly before adding the next. Once all eggs are added, whip for an additional minute at medium-high speed.
Stop the mixer, then add the sour cream and vanilla. Mix on low speed until smooth and lump-free (about 2–3 minutes). Avoid overmixing to prevent cracks during baking.
Finally, tap the bowl on the counter to release any air bubbles. This little trick will save you from holes or bubbles in the final cheesecake.
3. Color the Batter
Divide the cheesecake batter into five bowls. Tint each portion with a different food coloring gel — pink, purple, blue, green, and yellow. Mix gently until evenly colored.
Pro Tip: Gel-based food coloring keeps your batter thick and creamy, unlike liquid coloring that can make it runny. The colors will stay vibrant and visually stunning.
4. Assemble and Bake
Remove the crust mold from the freezer. Fill each cavity with approximately 2 teaspoons of colored cheesecake batter. Place the filled mold into a rimmed baking pan.
Add 1–2 cups of water to the pan to create a water bath. The water should reach at least halfway up the sides of the molds. This method ensures even baking and prevents cracks, giving your mini cheesecakes that silky smooth finish.
Bake on the middle rack for 18–24 minutes, or until the tops are no longer glossy, edges are set, and the centers are slightly jiggly.
Pro Tip: Water baths are essential for creamy cheesecakes. They regulate temperature and add moisture, resulting in a velvety texture.
5. Cool and Freeze
After baking, leave the pan in the water bath and let the cheesecakes cool to room temperature. Once cooled, transfer the mold to the freezer for 4–6 hours or overnight.
To remove, gently release the mold edges and push up from the bottom. Each mini cheesecake should pop out perfectly intact.
Pro Tip: These mini cheesecakes hold their shape beautifully after freezing, making them ideal for gifting or serving at parties.
Serving and Storage
These little cheesecakes shine in any setting:
Serve on a platter for gatherings
Package individually in clear boxes or jars for gifts
Garnish with sprinkles, edible glitter, or a small candy heart
Storage Tips:
Refrigerate: Up to 7 days in an airtight container
Freeze: Up to 3 months
Pro Tip: Let frozen mini cheesecakes thaw in the fridge for 1–2 hours before serving to enjoy that perfect creamy texture.
FAQs About Conversation Hearts Mini Cheesecakes
Q: Can I make these ahead of time?
Yes! Assemble and freeze them, then thaw before serving. They actually hold their shape better after chilling.
Q: Can I use a different crust?
Absolutely! Oreo crumbs, chocolate graham crackers, or even cookie crumbles work beautifully. Adjust butter amounts accordingly.
Q: What if I don’t have a silicone mold?
Mini muffin tins lined with paper cups work as an alternative. Baking time may need slight adjustment.
Q: Can I use different colors or flavors?
Yes! Vanilla, chocolate, lemon, or strawberry extract can be added. Swap colors to match holidays or themes.
Ready to Make Your Own?
These Conversation Hearts Mini Cheesecakes are more than just a dessert — they’re a playful, colorful, and crowd-pleasing treat that brings joy to any table.
With just a few simple ingredients, a little patience, and some creativity, you can make cheesecakes that are as fun to make as they are to eat. I promise, the first bite of the creamy filling and buttery crust will make all the effort worth it.
So preheat your oven, grab your favorite silicone mold, and start creating mini cheesecakes that everyone will remember long after the last bite. Trust me — these are going to become a yearly favorite.
Pro Tip: Add a tiny candy heart on top for that extra “conversation heart” effect — it’s cute, festive, and irresistible.

If you loved making my Strawberry Breakfast Buns Roses, there’s so much more waiting for you in my book, Baking Magic: Awaken Your Inner Pastry Chef. It’s packed with simple tricks, pro tips, and show-stopping recipes to help you create unforgettable treats with ease.
Grab your copy on Amazon here and awaken your inner pastry chef today! 🍰✨
Disclaimer: Some links in this post are affiliate links, which means I may earn a small commission if you make a purchase—thank you for supporting my baking projects!

Conversation Hearts Mini Cheesecakes
Valentine’s Day calls for sweet gestures, but sometimes a simple box of chocolates just doesn’t cut it. Enter Conversation Hearts Mini Cheesecakes — a playful, colorful, and utterly delicious twist on traditional cheesecakes. These bite-sized desserts combine a buttery graham cracker crust, creamy cheesecake filling, and vibrant pastel colors reminiscent of classic conversation hearts. Perfect for parties, gifting, or just indulging yourself, this recipe is as fun to make as it is to eat.
Ingredients
- 105 g (approx. 15 squares) graham crackers
- 55 g (1/2 stick) unsalted butter, melted and cooled
- 1/4 tsp ground cinnamon
- 454 g (16 oz) cream cheese, softened
- 200 g (1 cup) granulated sugar
- 3 large eggs, room temperature
- 454 g (16 oz) sour cream, room temperature
- 1 tsp vanilla extract
- Pink, purple, blue, green, yellow food coloring gels
Instructions
- Prepare the Crust. Preheat your oven to 325°F. In a food processor, blend the graham crackers until finely ground. Add the cooled melted butter and cinnamon, pulsing just until combined. Using a teaspoon, ice cream scooper, or shot glass, press approximately 1 teaspoon of crust into each mold cavity. Smooth with the back of your spoon or fingers. Freeze the mold while you prepare the cheesecake batter — this ensures the crust sets and won’t crumble when baked.
- Make the Cheesecake Filling. In the bowl of a stand mixer fitted with a whisk attachment, whip the cream cheese for 5 minutes on medium-high speed until light, fluffy, and smooth. Add the sugar and mix on medium speed for 2–3 minutes until fully incorporated. Lower the mixer speed and add the eggs, one at a time, mixing each thoroughly before adding the next. Once all eggs are added, whip for an additional minute at medium-high speed. Stop the mixer, then add the sour cream and vanilla. Mix on low speed until smooth and lump-free (about 2–3 minutes). Avoid overmixing to prevent cracks during baking. Finally, tap the bowl on the counter to release any air bubbles. This little trick will save you from holes or bubbles in the final cheesecake.
- Color the Batter. Divide the cheesecake batter into five bowls. Tint each portion with a different food coloring gel — pink, purple, blue, green, and yellow. Mix gently until evenly colored.
- Assemble and Bake. Remove the crust mold from the freezer. Fill each cavity with approximately 2 teaspoons of colored cheesecake batter. Place the filled mold into a rimmed baking pan. Add 1–2 cups of water to the pan to create a water bath. The water should reach at least halfway up the sides of the molds. This method ensures even baking and prevents cracks, giving your mini cheesecakes that silky smooth finish. Bake on the middle rack for 18–24 minutes, or until the tops are no longer glossy, edges are set, and the centers are slightly jiggly.
- Cool and Freeze. After baking, leave the pan in the water bath and let the cheesecakes cool to room temperature. Once cooled, transfer the mold to the freezer for 4–6 hours or overnight. To remove, gently release the mold edges and push up from the bottom. Each mini cheesecake should pop out perfectly intact.