
Melted Witch Chocolate Cookies! 🍪💚🧙♀️ A Spooky-Sweet Treat You’ll Love
Looking for a fun and festive treat to celebrate Halloween—or just to get your creativity bubbling in the kitchen? These Melted Witch Chocolate Cookies are a perfect combination of spooky, sweet, and seriously fun to make! With gooey chocolate, playful decorations, and a touch of Halloween magic, they’re perfect for parties, trick-or-treaters, or a cozy baking session with family. Plus, they’re so Instagrammable you might have to make two batches—one to eat, one to photograph!
Here’s your complete guide to creating these adorably spooky witch cookies that are sure to enchant everyone who takes a bite.
Why You’ll Love These Melted Witch Cookies
Chocolate cookies are already a crowd favorite, but adding whimsical witchy toppings makes them unforgettable. These cookies combine:
Chocolatey goodness: Soft, baked chocolate cookies are the base of this treat.
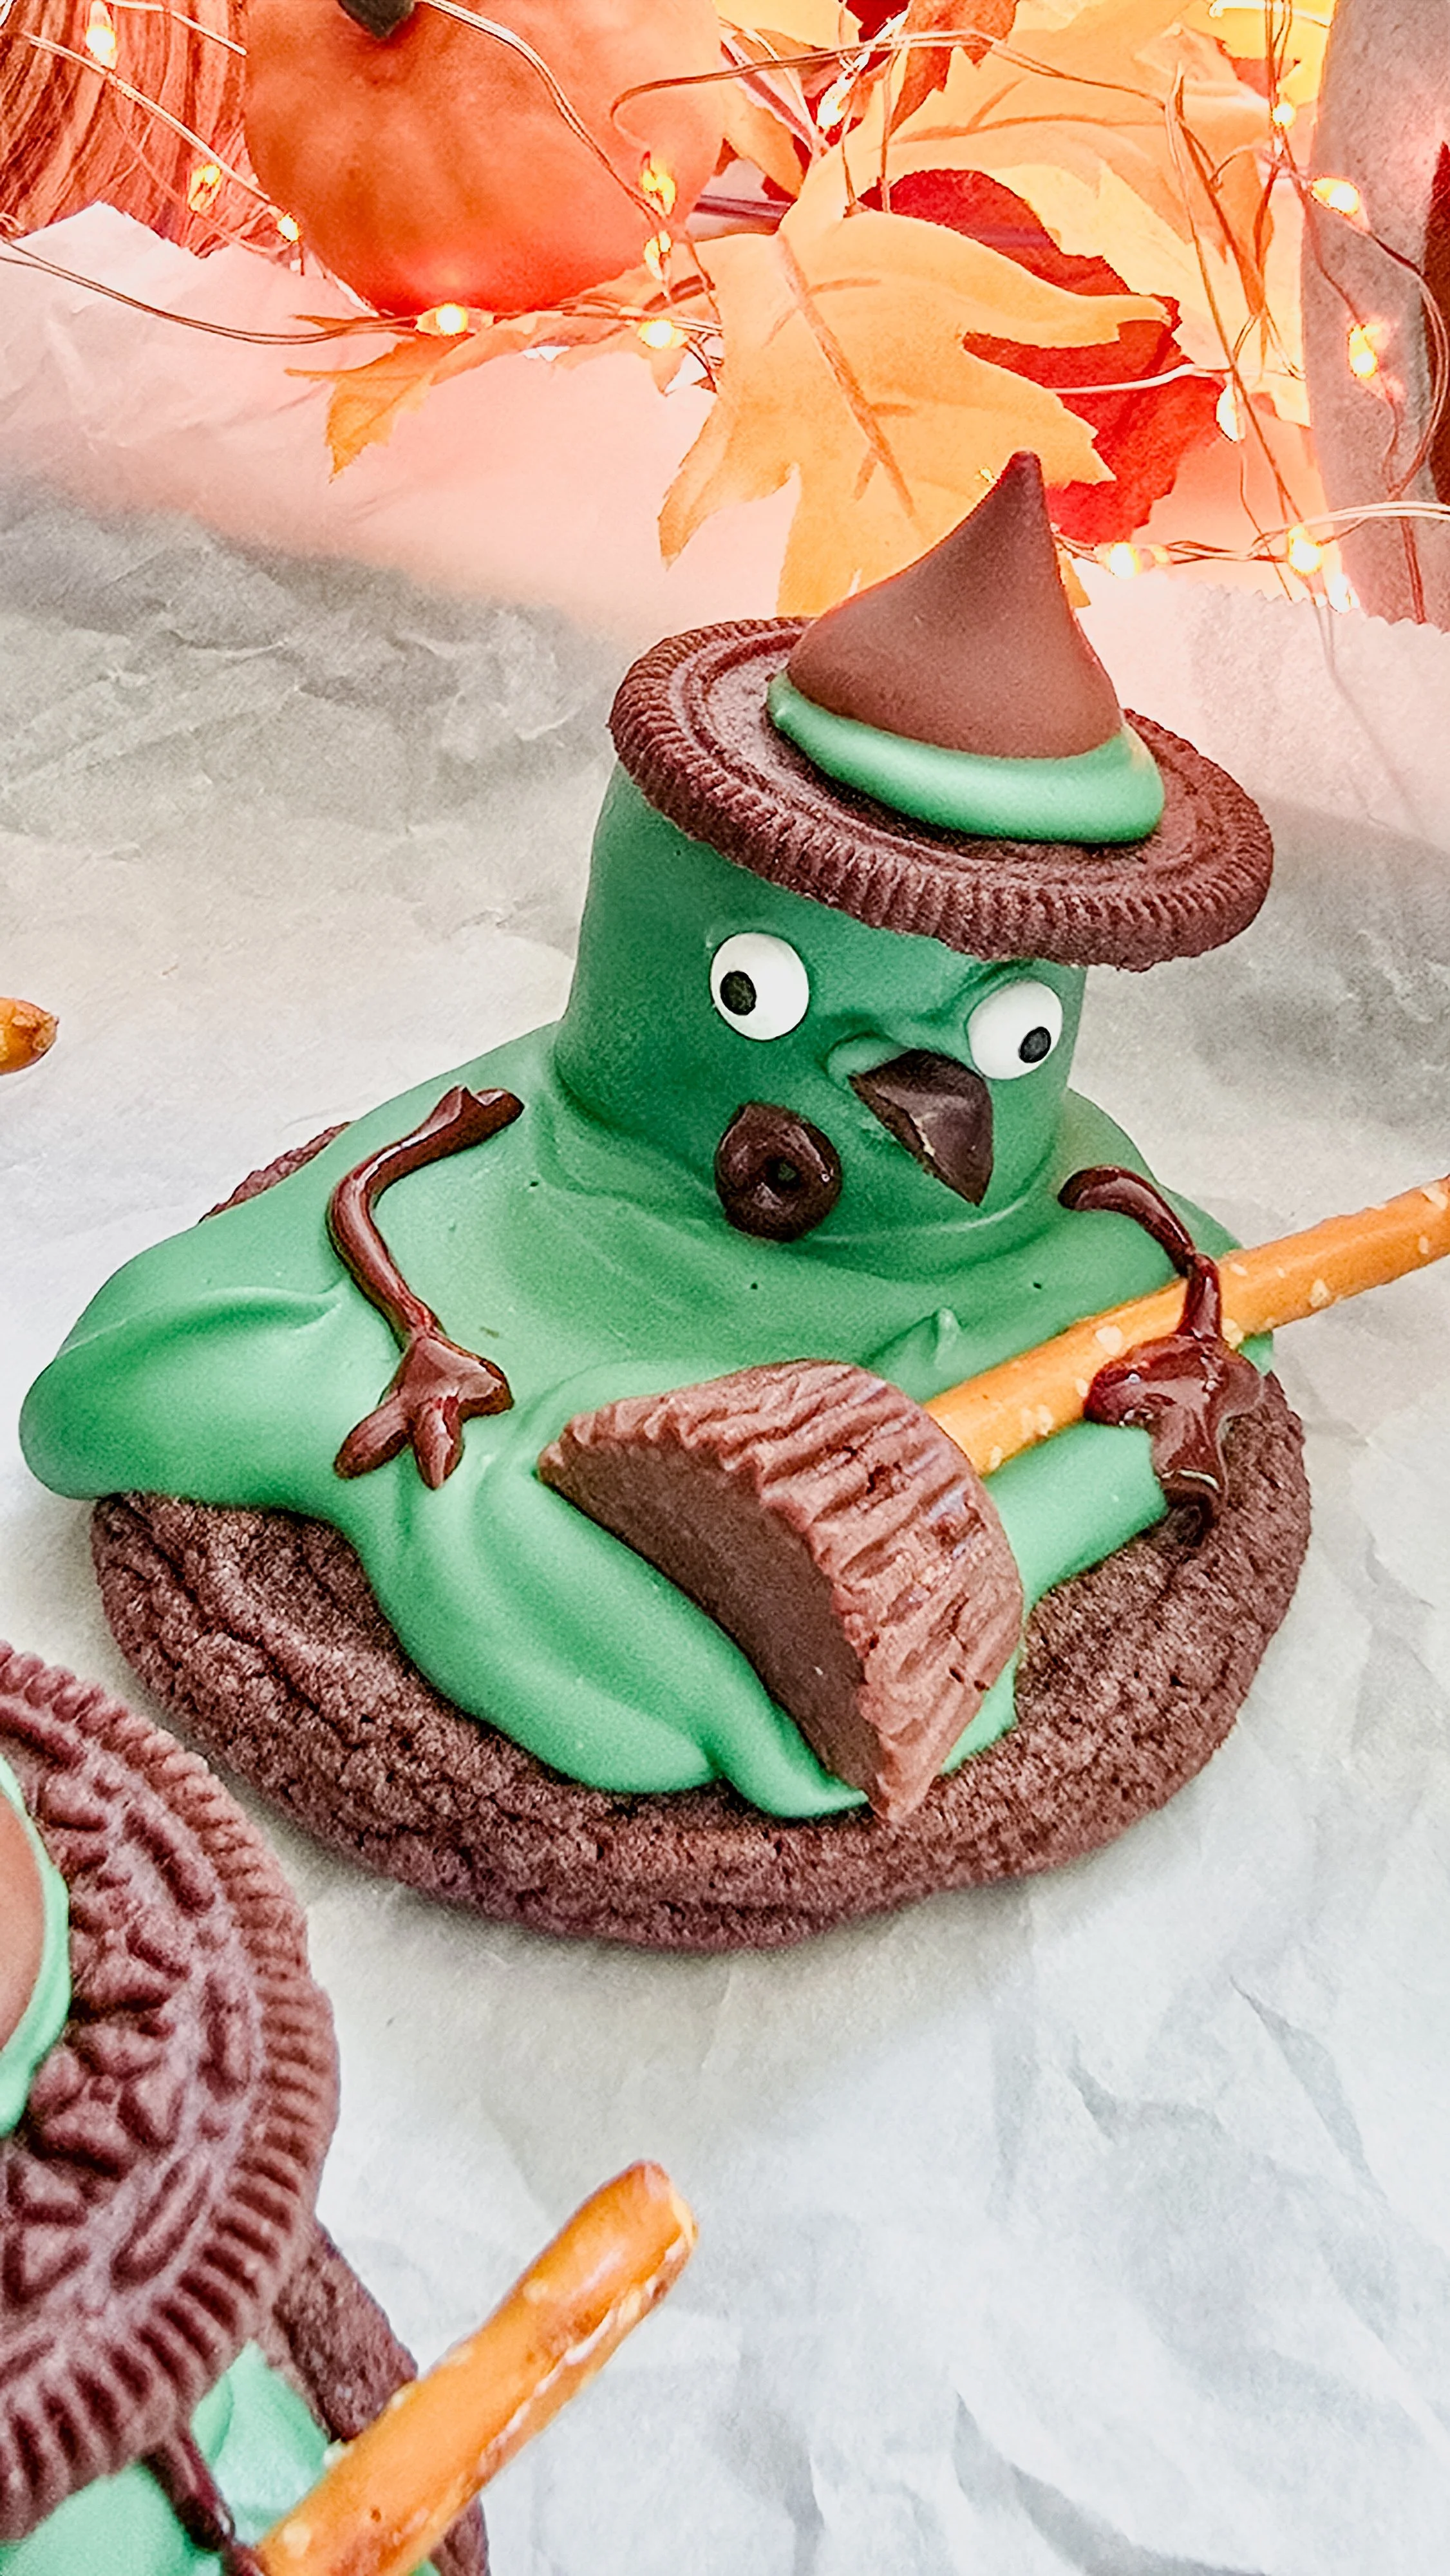
Creative decorations: Edible eyes, mini peanut butter cups, marshmallows, pretzels, and colorful chocolate melts transform simple cookies into little witches.
Hands-on fun: These cookies are almost like edible crafts, perfect for kids or the young-at-heart.
Customizable design: Change up your witches’ hats, brooms, or colors depending on your theme or candy stash.
Not only are these cookies fun to make, but they also spark creativity and are a fantastic conversation starter at any Halloween gathering.
Ingredients You’ll Need
To make your Melted Witch Chocolate Cookies, gather the following ingredients. Each one adds flavor, texture, or fun to your spooky creation:
Chocolate Cookies (baked and cooled) – The base of your witch cookies! Soft, chewy chocolate cookies provide the perfect foundation for all your candy decorations. You can use homemade cookies or a store-bought variety.
Forest Green and Dark Chocolate Melting Wafers – These colorful wafers melt smoothly and set quickly, making them ideal for decorating. Forest green creates the witch’s robe or body, while dark chocolate adds details like arms and mouths.
Marshmallows – Fluffy and sweet, marshmallows become the witch’s head. Their soft texture pairs perfectly with the chocolate coating and candy decorations.
Mini Peanut Butter Cups – Tiny, creamy, chocolatey peanut butter cups form the base of the witch’s broomstick. Their sweetness contrasts nicely with the salty pretzel bristles.
Mini Pretzel Sticks – Crunchy and slightly salty, pretzels mimic broom bristles. They also add a fun texture contrast to the soft cookie and marshmallow.
Oreo Cookies – Classic chocolate sandwich cookies create a whimsical witch hat base when paired with a Hershey Kiss. They also add chocolatey crunch.
Hershey Kisses – The iconic chocolate kisses form the pointy tip of the witch’s hat, giving your cookies that instantly recognizable witchy silhouette.
M&M’s (halved) – Colorful candy pieces make a cute little nose. Halving them ensures the nose is the perfect size for the marshmallow head.
Edible Googly Eyes – These playful eyes give your witch cookies personality and charm, instantly making them more fun and festive.
Step-by-Step Directions
Follow these instructions to bring your witches to life:
1. Bake and Cool Your Chocolate Cookies
If you’re making cookies from scratch, choose a rich chocolate cookie recipe that yields soft, chewy cookies. Let them cool completely before decorating; this prevents the chocolate melts from sliding off.
2. Prepare the Green Chocolate “Puddle”
Melt your forest green chocolate wafers according to package instructions. Using a spoon, dump and spread a puddle (not too thin!) onto each cookie. This will serve as the witch’s body or robe.
3. Decorate the Marshmallow Witch Head
Insert a toothpick into each marshmallow and dip it into the green chocolate melts. This will become your witch’s head. Stick the marshmallow on the green chocolate puddle on your cookie.
4. Build the Witch Hat
Place a Hershey Kiss on top of the marshmallow head.
Layer a mini Oreo underneath the Hershey Kiss for extra flair. The combination creates a classic pointy witch hat shape.
5. Add the Broom
Insert a mini peanut butter cup near the marshmallow.
Stick a few mini pretzel sticks into the peanut butter cup to create a broom handle and bristles. This adds whimsical detail and a bit of crunch.
6. Add the Face Details
Place halved M&Ms on the marshmallow for the nose.
Stick edible googly eyes just above the nose.
Pipe the mouth and arms with melted dark or milk chocolate, or use brown candy melts. Use a toothpick or small piping bag for precision.
7. Chill to Set
Freeze the decorated cookies for 10–15 minutes. This helps the chocolate melts harden and keeps all the candy decorations securely in place.
8. Serve and Enjoy!
Once set, your Melted Witch Chocolate Cookies are ready to impress. Arrange them on a platter for a Halloween party centerpiece, or gift them in a festive box.
Tips for Success
Use good-quality melting chocolate: It melts smoothly and gives your cookies a professional finish.
Don’t overfill with candy: A balanced cookie is easier to eat and keeps decorations intact.
Try different colors: Swap green for purple, orange, or black chocolate melts to match your party theme.
Customize your witches: Different hat shapes, broom styles, or facial expressions give each cookie a unique personality.
Work quickly: Chocolate melts set fast. If it begins to harden, gently reheat for smooth application.
Fun Facts About Chocolate and Halloween
Did you know these fun tidbits about chocolate and Halloween treats?
Chocolate has been consumed for thousands of years, originating in Mesoamerica, where it was used in ceremonies and as a luxury drink.
Halloween candy traditions in the U.S. date back to the early 20th century. Before that, kids often celebrated with nuts, apples, or homemade treats.
Green is often associated with witches in popular culture because of classic illustrations and films—think Wicked Witch of the West!
Combining chocolate cookies with colorful Halloween decorations is a modern way to merge history, creativity, and flavor.
Variations You Can Try
Spooky Spider Witches: Add thin black licorice strips to create spider legs.
Pumpkin Patch Witches: Place small candy pumpkins around your cookie scene.
Vegan or Allergy-Friendly: Swap dairy chocolate and marshmallows for vegan alternatives.
The possibilities are endless! These cookies encourage experimentation, making them perfect for baking with kids or for a themed party.
Perfect for Any Occasion
While these Melted Witch Chocolate Cookies scream Halloween, they’re also versatile enough for:
Birthday parties with a magical or fantasy theme
Sleepovers or craft days
Cookie exchanges or gifting during fall
They’re fun, easy to transport, and guaranteed to bring smiles. Creating your own Melted Witch Chocolate Cookies is more than baking—it’s crafting edible magic. From the chocolate cookie base to the whimsical candy details, every step is a chance to be playful and creative. Whether you’re baking with kids, surprising friends, or simply indulging in your sweet tooth, these cookies deliver both taste and entertainment.
So grab your green melts, marshmallows, and candy stash, and get ready to conjure up some deliciously spooky treats. Your Melted Witch Chocolate Cookies are sure to vanish from the plate faster than a broomstick on a full moon night! 🧙♀️💚🧹
Ready to Take Your Baking to the Next Level?

If you loved making my Strawberry Breakfast Buns Roses, there’s so much more waiting for you in my book, Baking Magic: Awaken Your Inner Pastry Chef. It’s packed with simple tricks, pro tips, and show-stopping recipes to help you create unforgettable treats with ease.
Grab your copy on Amazon here and awaken your inner pastry chef today! 🍰✨

Melted Witch Chocolate Cookies
Looking for a fun and festive treat to celebrate Halloween—or just to get your creativity bubbling in the kitchen? These Melted Witch Chocolate Cookies are a perfect combination of spooky, sweet, and seriously fun to make! With gooey chocolate, playful decorations, and a touch of Halloween magic, they’re perfect for parties, trick-or-treaters, or a cozy baking session with family. Plus, they’re so Instagrammable you might have to make two batches—one to eat, one to photograph!
Ingredients
- Chocolate Cookies (baked and cooled) – The base of your witch cookies! Soft, chewy chocolate cookies provide the perfect foundation for all your candy decorations. You can use homemade cookies or a store-bought variety.
- Forest Green and Dark Chocolate Melting Wafers – These colorful wafers melt smoothly and set quickly, making them ideal for decorating. Forest green creates the witch’s robe or body, while dark chocolate adds details like arms and mouths.
- Marshmallows – Fluffy and sweet, marshmallows become the witch’s head. Their soft texture pairs perfectly with the chocolate coating and candy decorations.
- Mini Peanut Butter Cups – Tiny, creamy, chocolatey peanut butter cups form the base of the witch’s broomstick. Their sweetness contrasts nicely with the salty pretzel bristles.
- Mini Pretzel Sticks – Crunchy and slightly salty, pretzels mimic broom bristles. They also add a fun texture contrast to the soft cookie and marshmallow.
- Oreo Cookies – Classic chocolate sandwich cookies create a whimsical witch hat base when paired with a Hershey Kiss. They also add chocolatey crunch.
- Hershey Kisses – The iconic chocolate kisses form the pointy tip of the witch’s hat, giving your cookies that instantly recognizable witchy silhouette.
- M&M’s (halved) – Colorful candy pieces make a cute little nose. Halving them ensures the nose is the perfect size for the marshmallow head.
- Edible Googly Eyes – These playful eyes give your witch cookies personality and charm, instantly making them more fun and festive.
Instructions
- Bake and Cool Your Chocolate Cookies. If you’re making cookies from scratch, choose a rich chocolate cookie recipe that yields soft, chewy cookies. Let them cool completely before decorating; this prevents the chocolate melts from sliding off.
- Prepare the Green Chocolate “Puddle”. Melt your forest green chocolate wafers according to package instructions. Using a spoon, dump and spread a puddle (not too thin!) onto each cookie. This will serve as the witch’s body or robe.
- Decorate the Marshmallow Witch Head. Insert a toothpick into each marshmallow and dip it into the green chocolate melts. This will become your witch’s head. Stick the marshmallow on the green chocolate puddle on your cookie.
- Build the Witch Hat. Place a Hershey Kiss on top of the marshmallow head. Layer a mini Oreo underneath the Hershey Kiss for extra flair. The combination creates a classic pointy witch hat shape.
- Add the Broom. Insert a mini peanut butter cup near the marshmallow. Stick a few mini pretzel sticks into the peanut butter cup to create a broom handle and bristles. This adds whimsical detail and a bit of crunch.
- Add the Face Details. Place halved M&Ms on the marshmallow for the nose. Stick edible googly eyes just above the nose. Pipe the mouth and arms with melted dark or milk chocolate, or use brown candy melts. Use a toothpick or small piping bag for precision.
- Chill to Set. Freeze the decorated cookies for 10–15 minutes. This helps the chocolate melts harden and keeps all the candy decorations securely in place.
- Serve and Enjoy! Once set, your Melted Witch Chocolate Cookies are ready to impress. Arrange them on a platter for a Halloween party centerpiece, or gift them in a festive box.