
Printed Design Cheesecake-Filled Cookie Sandwiches
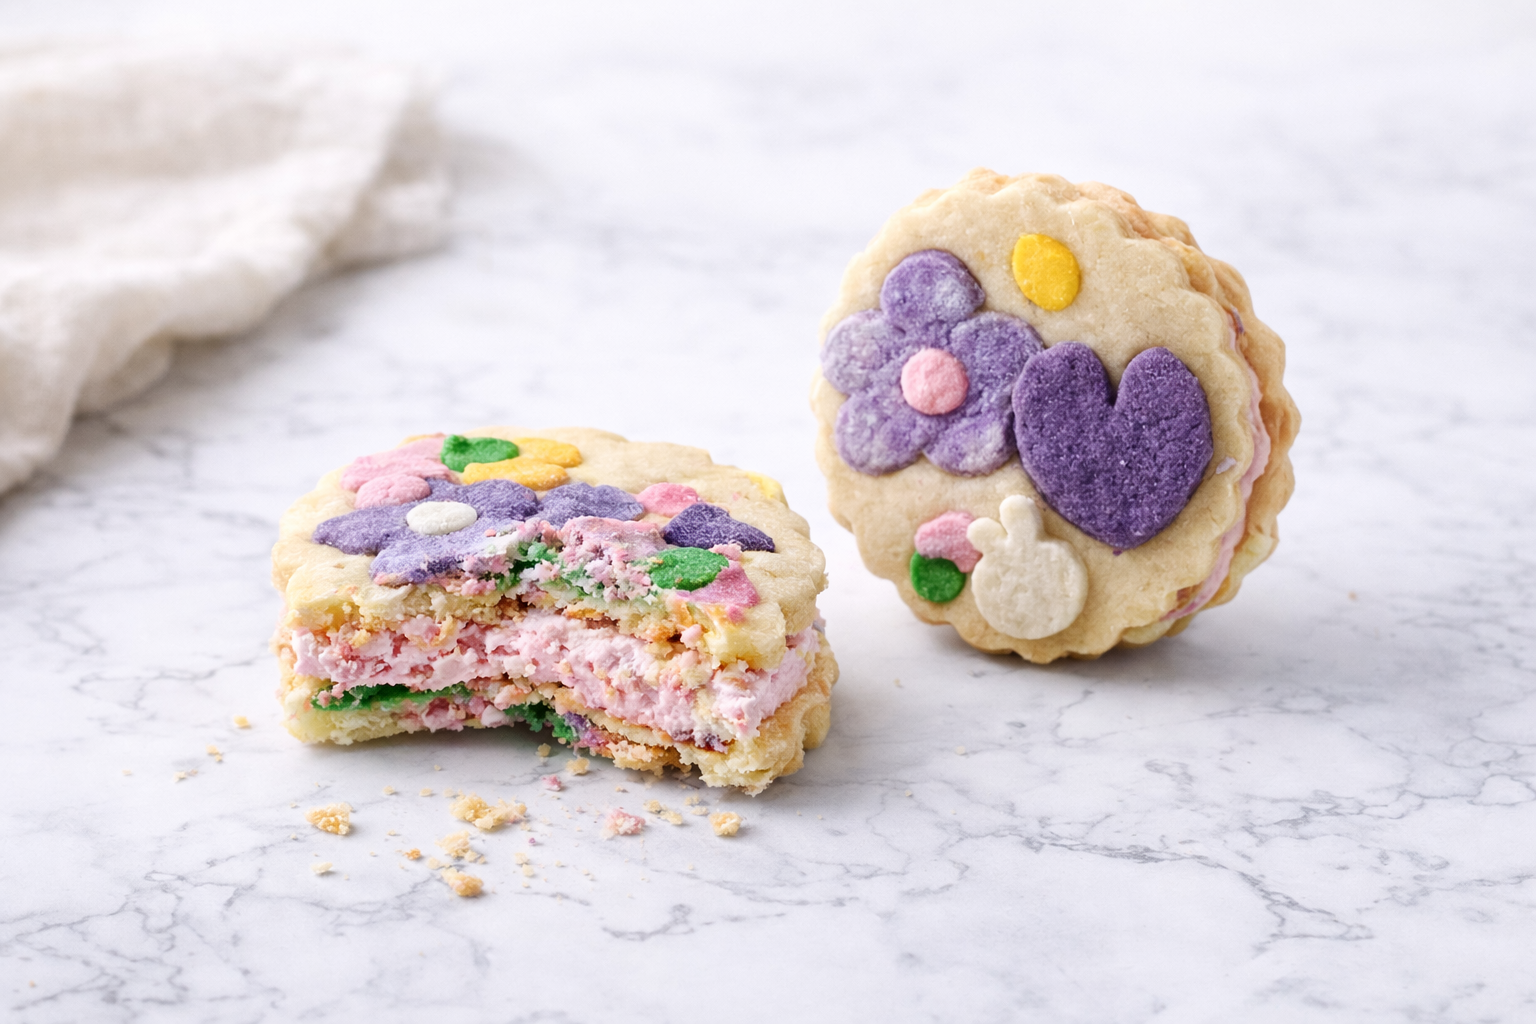
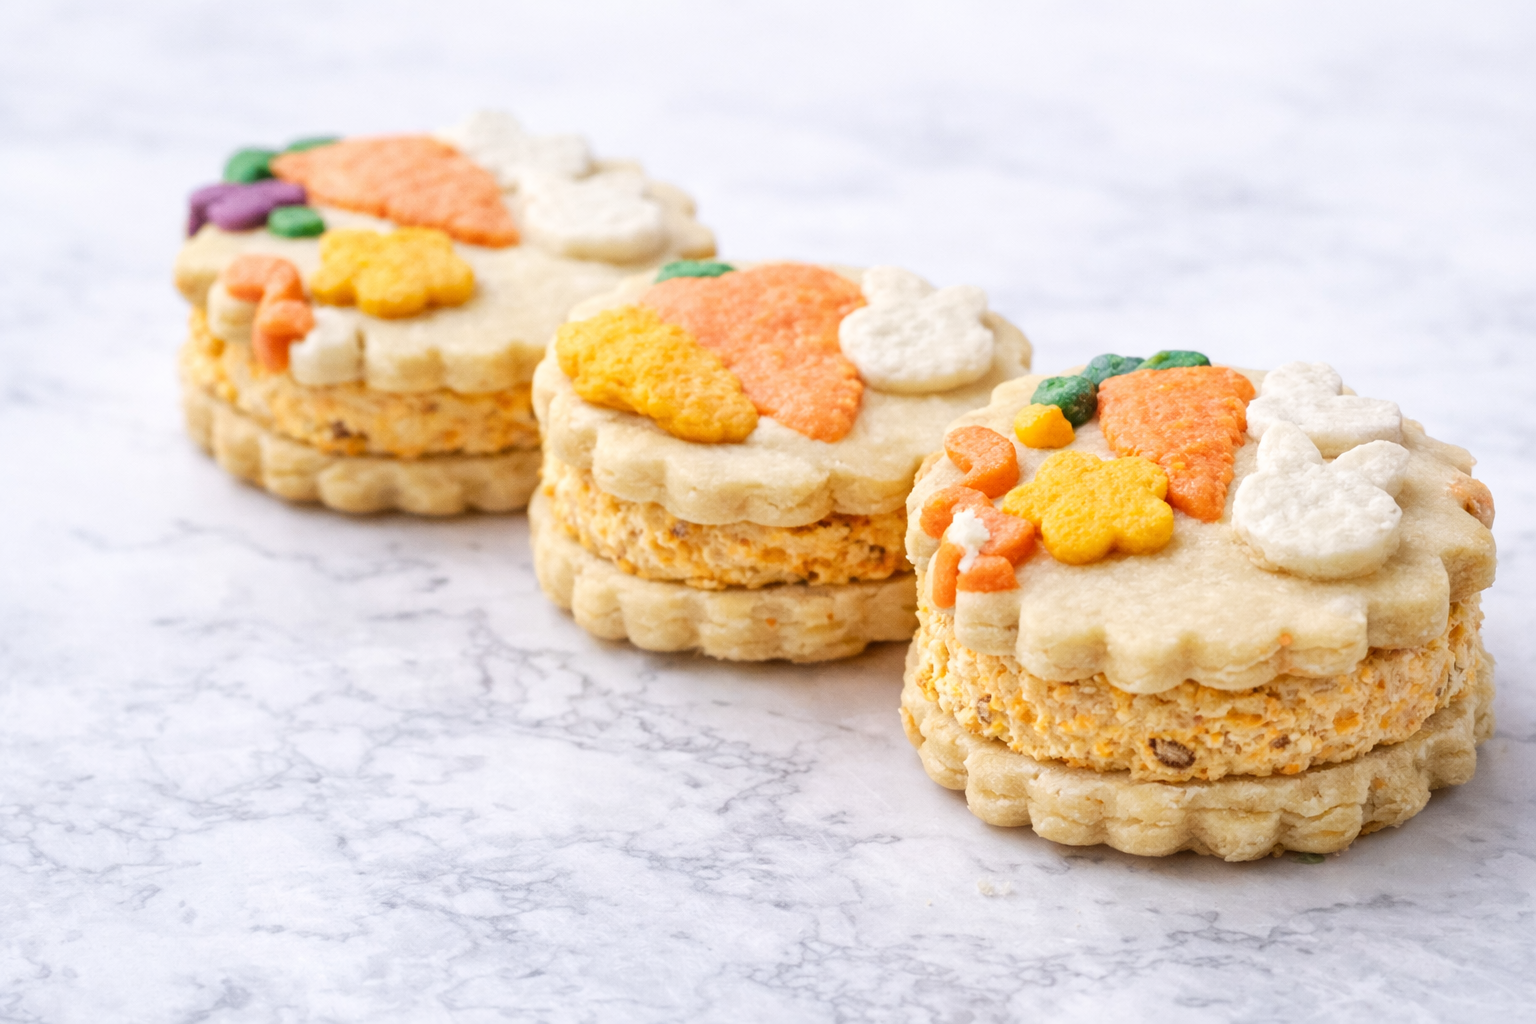
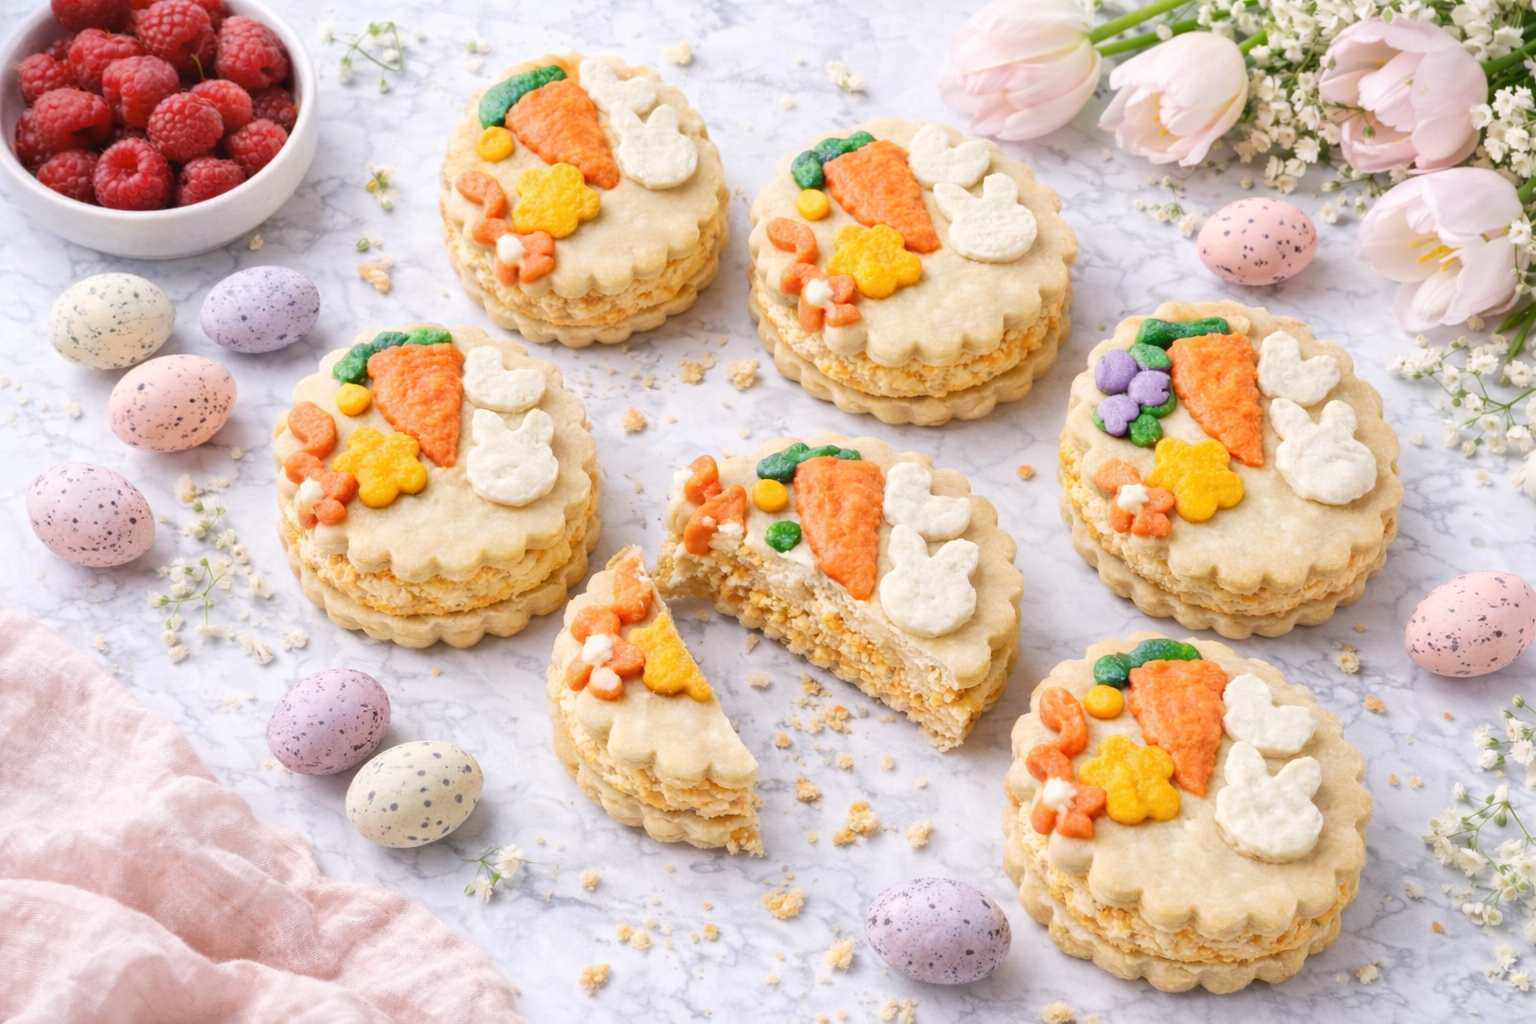
Looking for a treat that’s not only delicious but a work of art? My Printed Design Cheesecake Filled Cookie Sandwiches are about to become your new obsession! Imagine biting into a perfectly piped carrot cheesecake or raspberry cheesecake, sandwiched between my signature Citrus & Spice no-spread cookie dough—so pretty, you’ll almost feel bad eating them. Almost. 😉 These cookies are like little edible art and the best part? You don’t even have to bake the cheesecakes—just pipe, assemble, and enjoy! Whether you’re celebrating or just want to treat yourself, these spring-themed beauties will brighten up any day!
Summary and Skillset:
No-bake, stable, pipable carrot cheesecake
No-bake, stable, pipeable raspberry cheesecake
Signature “Citrus & Spice” no-spread cookie dough
Techniques: Coloring, shaping, and designing two spring-themed cookie patterns
Yields:
24-36 servings (depending on the size of your cookie cutters).
These whimsical sandwiches serve up to 36, depending on your cookie cutter size, making them perfect for sharing or saving for later.
Equipment and Supplies needed:
Digital Kitchen Scale
Stand or Hand Mixer
Stand Mixer’s Bowl, Paddle and Whisk Attachment
Small and Medium Bowls
Baking Pan/Sheet
Silicone AND Off-Set Spatulas
Measuring Spoons
Mesh Sifter
Hand Whisk
2 Piping Bags
Piping Tips (OPTIONAL: by Wilton: 1A or 2A, or 8B, or alternative brands, SIMILAR LARGE ROUND AND/OR OPEN STAR PIPING TIPS)
Small and Medium Sauce Pans/Pots
Kitchen Plastic/ Glade/Cling Film
Parchment Paper
Round and Scalloped (or Flower Shaped) 3-4” Cookie Cutters
Small/Mini Flowers, Leaves, Bunny or Bear, Carrot Cookie Cutters
All Ingredients Needed:
All-Purpose Flour
Cornstarch
Salt
Ground Cinnamon
Powdered Sugar
Unsalted Butter
Eggs
Vanilla Extract
Unflavored Gelatin
Cream Cheese
Carrots
Fresh or Frozen Raspberries
Lemon
Brown Sugar
Nutmeg
Ground Cloves
Water
Heavy Cream
RECIPES:
Signature No Spread “Citrus & Spice” Cookie Dough Recipe
My Citrus & Spice no-spread cookie dough is perfect for decorating, with warm notes of cinnamon and a refreshing burst of lemon zest. It’s the base I use for my fun printed design cheesecake cookie sandwiches, and trust me—this dough never disappoints!
Pro tip: Weighing ingredients in grams is crucial for getting that perfect, no-spread texture, so don’t skip this step!
Ingredients:
250 g all-purpose flour
22 g cornstarch
3 g salt
3 g ground cinnamon
75 g powdered sugar
113 g (1 stick) unsalted butter, cold
1 large egg, room temperature
1 tsp vanilla extract
Zest of 1 lemon
Food coloring gels: Burgundy (preferred), or pink, purple, orange, yellow, green/avocado, white
Directions:
Step 1: Mix the dry ingredients:
Sift the flour, cornstarch, salt, cinnamon, and powdered sugar into the bowl of your stand mixer fitted with the paddle attachment. Mix on low speed until everything’s combined.
Step 2: Add the butter:
While the mixer is still running on low, gradually add the cubed cold butter. Keep mixing until the texture looks like coarse cornmeal.
Step 3: Bring it together:
Add the egg, vanilla extract, and lemon zest to the mix. Continue mixing until the dough comes together and starts to form a ball.
Step 4: Chill the dough:
Transfer the dough to plastic wrap, shape it into a flat disc, and refrigerate for 30 minutes. While it chills, you can start prepping your no-bake cheesecakes!
Step 5: Color the dough:
Once the dough is chilled, remove it from the fridge and let it sit at room temperature for 5-10 minutes. Divide about five tablespoons of dough and color each portion with your preferred food coloring gels—burgundy (my favorite!), or pink, purple, orange, yellow, green, and white.
Step 6: Roll it out:
Roll the remaining uncolored dough to about ¼" thickness between two sheets of parchment paper (this helps prevent sticking without needing extra flour). Pop the rolled dough into the freezer for 5-10 minutes to firm up a bit.
Step 7: Shape and design:
While the uncolored dough chills, roll out each colored dough portion to ⅛" thickness. Use small cutters to cut out your desired shapes and place them on a parchment-lined baking sheet. Freeze these colored shapes until you’re ready to assemble.
Step 8: Assemble the cookies:
Remove the uncolored dough from the freezer and transfer it to a perforated baking mat or leave it on parchment. Take the frozen colored shapes and arrange them over the uncolored dough. Gently place a sheet of parchment on top and lightly roll over it to press the designs into the dough. Cut out 3-4" rounds or use scalloped/flower cutters for extra flair. Pop the cut cookies back into the freezer for another 5-10 minutes to set.
Step 9: Bake:
Preheat your oven to 350°F (175°C). Bake the cookies on the middle rack for 12-15 minutes, or until the edges are just set. Allow the cookies to cool completely on the baking sheet before moving them.
These cookies are perfect for customizing and decorating with beautiful spring designs! Whether you're making them for a special occasion or just because they’re a true showstopper.
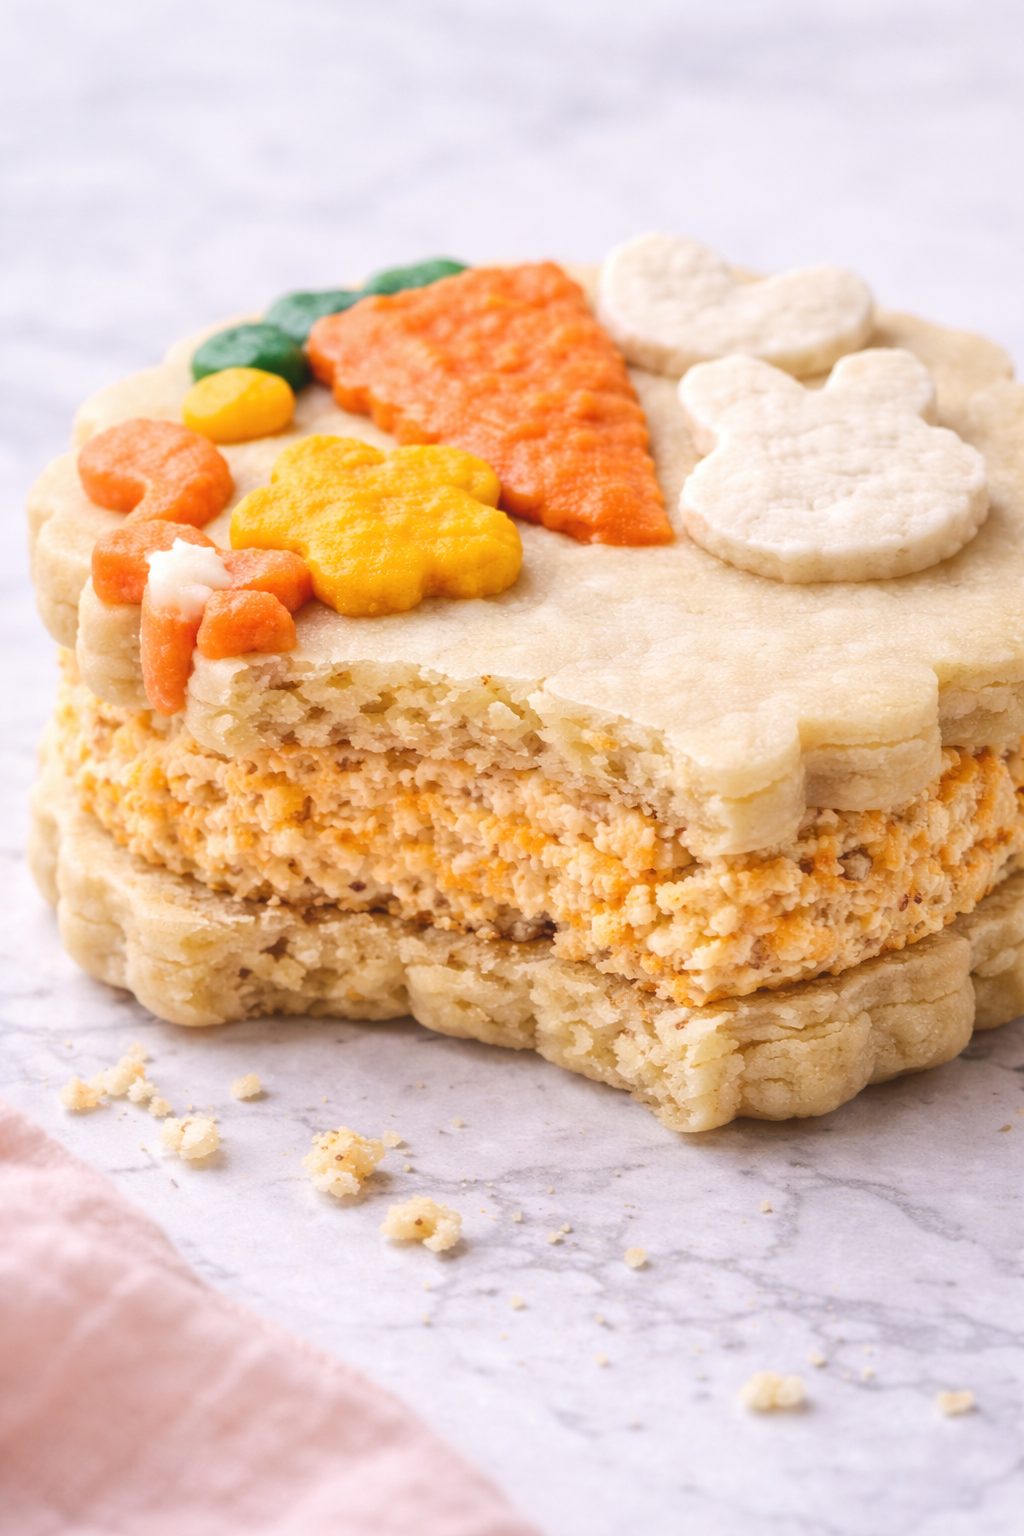
Carrot Cheesecake
This no-bake carrot cheesecake is everything! It’s smooth, lightly spiced, and perfectly sweetened with brown sugar, plus it has a little hidden veggie boost. The best part? No need to turn on your oven! This filling is stable and pipable, making it perfect for assembling elegant desserts.
Ingredients:
12 oz full-fat cream cheese, room temperature
½ cup light brown sugar
½ tsp vanilla extract
½ tsp ground cinnamon
¼ tsp ground nutmeg
1/8 tsp ground cloves
¼ tsp salt
1/3 cup finely grated carrots
1 tsp unflavored gelatin
2 tbsp cold water
Directions:
Step 1: Bloom the gelatin:
In a small bowl, sprinkle the gelatin over 2 tablespoons of cold water. Let it bloom for about 5 minutes while you prep the rest of the ingredients.
Step 2: Whip the cream cheese:
Add the room-temperature cream cheese to the bowl of your stand mixer fitted with a paddle attachment. Beat on medium-high speed until it’s smooth and fluffy—about 2-3 minutes.
Step 3: Add the spices and sugar:
Reduce the mixer speed to low and add the light brown sugar, vanilla extract, cinnamon, nutmeg, cloves, and salt. Mix until everything is well combined and smooth.
Step 4: Incorporate the gelatin:
Microwave the bloomed gelatin for 5-10 seconds until it's melted into a liquid. With the mixer on low, slowly drizzle the melted gelatin into the cream cheese mixture. Then, add the finely grated carrots and continue mixing on low until everything is fully incorporated.
Step 5: Pipe and set aside:
Transfer the carrot cheesecake filling into a piping bag fitted with a large round or open star tip, depending on the look you’re going for. Set it aside and it’s ready to use as the perfect filling for cookies, cakes, or even as a delicious dip!
Packed with flavor from warm spices and sweet carrots, it’s not only delicious but also a fun and unexpected twist to your spring desserts! Whether you’re piping it into sandwich cookies or topping cupcakes, this filling is sure to impress.
Raspberry Cheesecake
This raspberry cheesecake filling is the perfect combination of creamy and fruity, with just the right amount of tang from a homemade raspberry sauce. It’s ideal for filling cookies, and cakes, or even enjoying by the spoonful. Plus, with no need to bake, it’s super easy to whip up! Here's how you can make it step by step, along with storage tips to keep everything fresh.
Raspberry Sauce:
Ingredients:
4 oz fresh or frozen (thawed) raspberries
¼ cup granulated sugar
1 tbsp cornstarch
Directions:
Step 1: Make the sauce:
Start by pureeing the raspberries in a food processor or blender. Once smooth, strain the puree through a mesh sieve to remove the seeds, giving you a silky-smooth raspberry sauce.
Step 2: Cook the sauce:
In a small saucepan, whisk together the raspberry puree, sugar, and cornstarch. Cook over medium heat, stirring continuously until the mixture thickens (about 2-3 minutes). Once it’s done, transfer the sauce to a heatproof container and set it aside to cool.

Raspberry Cheesecake Filling:
Ingredients:
8 oz cream cheese, room temperature
⅓ cup powdered sugar
¼ cup cold heavy whipping cream
1 tsp unflavored gelatin
2 tbsp cold water
Directions:
Step 1: Bloom the gelatin:
In a small bowl, sprinkle the gelatin over 2 tablespoons of cold water and let it bloom for 5 minutes.
Step 2: Cream the cheese:
In the bowl of your stand mixer fitted with a paddle attachment, beat the room-temperature cream cheese on medium-high speed until it’s smooth and fluffy (about 2-3 minutes).
Step 3: Add the powdered sugar and sauce:
Lower the mixer speed and add the powdered sugar. Once combined, slowly drizzle in the cooled raspberry sauce while the mixer is still going. Mix until everything is well incorporated.
Step 4: Add the gelatin:
Melt the gelatin in the microwave for 5-10 seconds until it’s liquefied. With the mixer on low, slowly drizzle the melted gelatin into the cream cheese mixture. Let it combine fully.
Step 5: Whip the cream:
In a separate bowl (or after cleaning your stand mixer), whip the cold heavy cream with the whisk attachment until stiff peaks form. Gently fold the whipped cream into the raspberry cream cheese mixture using a silicone spatula, creating a light and fluffy cheesecake filling.
Assembly:
Using piping bags fitted with large round or open star tips (1A, 2A, or 8B), fill half of your cookie sandwiches with the carrot cheesecake and the other half with this raspberry cheesecake. The combination of the two flavors is irresistible!
Serve immediately or refrigerate in an airtight container for up to 7 days.


Pro storage tips:
Filled cookies can be frozen for up to 30 days.
Unfilled cookie cutouts can be stored at room temperature for 7 days, refrigerated for 30 days, or frozen for up to 3 months.
Unused cheesecake mixtures can be frozen for up to 30 days or refrigerated for 7 days.
This raspberry cheesecake filling is perfect for pairing with just about any dessert, especially when piped between my signature Citrus & Spice cookies! It’s creamy, fruity, and absolutely delicious.
Enjoy!

Printed Design Cheesecake-Filled Cookie Sandwiches – A Fun, No-Bake Delight!
Ingredients
- All-Purpose Flour
- Cornstarch
- Salt
- Ground Cinnamon
- Powdered Sugar
- Unsalted Butter
- Eggs
- Vanilla Extract
- Unflavored Gelatin
- Cream Cheese
- Carrots
- Fresh or Frozen Raspberries
- Lemon
- Brown Sugar
- Nutmeg
- Ground Cloves
- Water
- Heavy Cream
- 250 g all-purpose flour
- 22 g cornstarch
- 3 g salt
- 3 g ground cinnamon
- 75 g powdered sugar
- 113 g (1 stick) unsalted butter, cold
- 1 large egg, room temperature
- 1 tsp vanilla extract
- Zest of 1 lemon
- Food coloring gels: Burgundy (preferred), or pink, purple, orange, yellow, green/avocado, white
- 12 oz full-fat cream cheese, room temperature
- ½ cup light brown sugar
- ½ tsp vanilla extract
- ½ tsp ground cinnamon
- ¼ tsp ground nutmeg
- 1/8 tsp ground cloves
- ¼ tsp salt
- 1/3 cup finely grated carrots
- 1 tsp unflavored gelatin
- 2 tbsp cold water
- 4 oz fresh or frozen (thawed) raspberries
- ¼ cup granulated sugar
- 1 tbsp cornstarch
- 8 oz cream cheese, room temperature
- ⅓ cup powdered sugar
- ¼ cup cold heavy whipping cream
- 1 tsp unflavored gelatin
- 2 tbsp cold water
Instructions
- Mix the dry ingredients: Sift the flour, cornstarch, salt, cinnamon, and powdered sugar into the bowl of your stand mixer fitted with the paddle attachment. Mix on low speed until everything’s combined.
- Add the butter: While the mixer is still running on low, gradually add the cubed cold butter. Keep mixing until the texture looks like coarse cornmeal.
- Bring it together: Add the egg, vanilla extract, and lemon zest to the mix. Continue mixing until the dough comes together and starts to form a ball.
- Chill the dough: Transfer the dough to plastic wrap, shape it into a flat disc, and refrigerate for 30 minutes. While it chills, you can start prepping your no-bake cheesecakes!
- Color the dough: Once the dough is chilled, remove it from the fridge and let it sit at room temperature for 5-10 minutes. Divide about five tablespoons of dough and color each portion with your preferred food coloring gels—burgundy (my favorite!), or pink, purple, orange, yellow, green, and white.
- Roll it out: Roll the remaining uncolored dough to about ¼" thickness between two sheets of parchment paper (this helps prevent sticking without needing extra flour). Pop the rolled dough into the freezer for 5-10 minutes to firm up a bit.
- Shape and design: While the uncolored dough chills, roll out each colored dough portion to ⅛" thickness. Use small cutters to cut out your desired shapes and place them on a parchment-lined baking sheet. Freeze these colored shapes until you’re ready to assemble.
- Assemble the cookies: Remove the uncolored dough from the freezer and transfer it to a perforated baking mat or leave it on parchment. Take the frozen colored shapes and arrange them over the uncolored dough. Gently place a sheet of parchment on top and lightly roll over it to press the designs into the dough. Cut out 3-4" rounds or use scalloped/flower cutters for extra flair. Pop the cut cookies back into the freezer for another 5-10 minutes to set.
- Bake: Preheat your oven to 350°F (175°C). Bake the cookies on the middle rack for 12-15 minutes, or until the edges are just set. Allow the cookies to cool completely on the baking sheet before moving them.
- Bloom the gelatin: In a small bowl, sprinkle the gelatin over 2 tablespoons of cold water. Let it bloom for about 5 minutes while you prep the rest of the ingredients.
- Whip the cream cheese: Add the room-temperature cream cheese to the bowl of your stand mixer fitted with a paddle attachment. Beat on medium-high speed until it’s smooth and fluffy—about 2-3 minutes.
- Add the spices and sugar: Reduce the mixer speed to low and add the light brown sugar, vanilla extract, cinnamon, nutmeg, cloves, and salt. Mix until everything is well combined and smooth.
- Incorporate the gelatin: Microwave the bloomed gelatin for 5-10 seconds until it's melted into a liquid. With the mixer on low, slowly drizzle the melted gelatin into the cream cheese mixture. Then, add the finely grated carrots and continue mixing on low until everything is fully incorporated.
- Pipe and set aside: Transfer the carrot cheesecake filling into a piping bag fitted with a large round or open star tip, depending on the look you’re going for. Set it aside and it’s ready to use as the perfect filling for cookies, cakes, or even as a delicious dip!
- Make the sauce: Start by pureeing the raspberries in a food processor or blender. Once smooth, strain the puree through a mesh sieve to remove the seeds, giving you a silky-smooth raspberry sauce.
- Cook the sauce: In a small saucepan, whisk together the raspberry puree, sugar, and cornstarch. Cook over medium heat, stirring continuously until the mixture thickens (about 2-3 minutes). Once it’s done, transfer the sauce to a heatproof container and set it aside to cool.
- Bloom the gelatin: In a small bowl, sprinkle the gelatin over 2 tablespoons of cold water and let it bloom for 5 minutes.
- Cream the cheese: In the bowl of your stand mixer fitted with a paddle attachment, beat the room-temperature cream cheese on medium-high speed until it’s smooth and fluffy (about 2-3 minutes).
- Add the powdered sugar and sauce: Lower the mixer speed and add the powdered sugar. Once combined, slowly drizzle in the cooled raspberry sauce while the mixer is still going. Mix until everything is well incorporated.
- Add the gelatin: Melt the gelatin in the microwave for 5-10 seconds until it’s liquefied. With the mixer on low, slowly drizzle the melted gelatin into the cream cheese mixture. Let it combine fully.
- Whip the cream: In a separate bowl (or after cleaning your stand mixer), whip the cold heavy cream with the whisk attachment until stiff peaks form. Gently fold the whipped cream into the raspberry cream cheese mixture using a silicone spatula, creating a light and fluffy cheesecake filling.
- Using piping bags fitted with large round or open star tips (1A, 2A, or 8B), fill half of your cookie sandwiches with the carrot cheesecake and the other half with this raspberry cheesecake. The combination of the two flavors is irresistible!
- Serve immediately or refrigerate in an airtight container for up to 7 days.


